
“ENT history, examination &
important tools”
Alkindy college of medicine
Fifth stage
2015 - 2016
Mostafa Hatim

List of contents
Slide number
History
3 - 8
Examination
9 - 97
Examination of the ear
11
Examination of the nose &
paranasal sinuses
44
Examination of the throat
64
Other examination & tools
87

History

History of Present Illness
and Review of System
General
The following characteristics of each symptom should be elicited and
explored:
• Onset (sudden or gradual), Chronology
• Current situation (improving or deteriorating)
• Location, Radiation
• Quality, Timing (frequency, duration), Severity
• Precipitating and aggravating factors, Relieving factors, Associated
symptoms
• Effects on daily activities
• Previous diagnosis of similar episodes, Previous treatments
• Efficacy of previous treatments

Cardinal Signs and Symptoms
In addition to the general characteristics outlined above, additional
characteristics of specific symptoms should be elicited, as follows:
• Ears
Recent changes in hearing
Compliance with and effectiveness of hearing aid
Itching, Earache, Discharge
Tinnitus, Vertigo
Ear trauma, Cotton Swab use
• Nose and Sinuses
Rhinorrhea, Epistaxis
Obstruction of airflow
Sinus pain and localized headache
Itching, Anosmia, Nasal trauma, Sneezing, Watery eyes

• Mouth and Throat
Hoarseness or recent voice change
Dental status, Oral lesions, Bleeding gums
Sore throat, Uvula midline, Dysphagia
• Neck
Pain
Swelling
Enlarged glands
Increasing headache associated with flexing of the neck
• Other Associated Symptoms
Fever, Malaise
Nausea or vomiting

Medical History
Medical History (general)
• Medical conditions and surgeries
• Allergies (seasonal as well as others)
• Medication currently used (prescription, oral contraceptives, over
the counter)
• Herbal preparations and traditional therapies
Medical History (Specific to ENT)
• Frequent ear or throat infections, Sinusitis
• Trauma to the head or ENT area, ENT surgery
• Hearing loss or audiometric screening results indicating hearing loss
• Seasonal allergies, Asthma
• Meniere’s disease, ENT cancer

Personal and Social History
(Specific to ENT)
• Others at home with similar symptoms
• Smoking
• Exposure to mould
• Frequent immersion of ears in water (eg swimming, bathing)
• Use of foreign object to clean ear
• Use of ear protection
• Crowded living conditions
• Sexual activity
• Personal and dental hygiene habits
• Exposure to cigarette smoke, wood smoke or other respiratory
irritants
• Recent air travel
• Occupational exposure to toxins or loud noises

Examination

Vitals
• Temperature
• Pulse
• Respiration
• SpO2
• Blood pressure (BP)
General Appearance
• Apparent state of health
• Appearance of comfort or distress
• Colour
• Nutritional status
• State of hydration
• Hygiene
• Match between appearance and stated age
• Difficulty with gait or balance
• Piercings and tattoos

Examination of
the ear
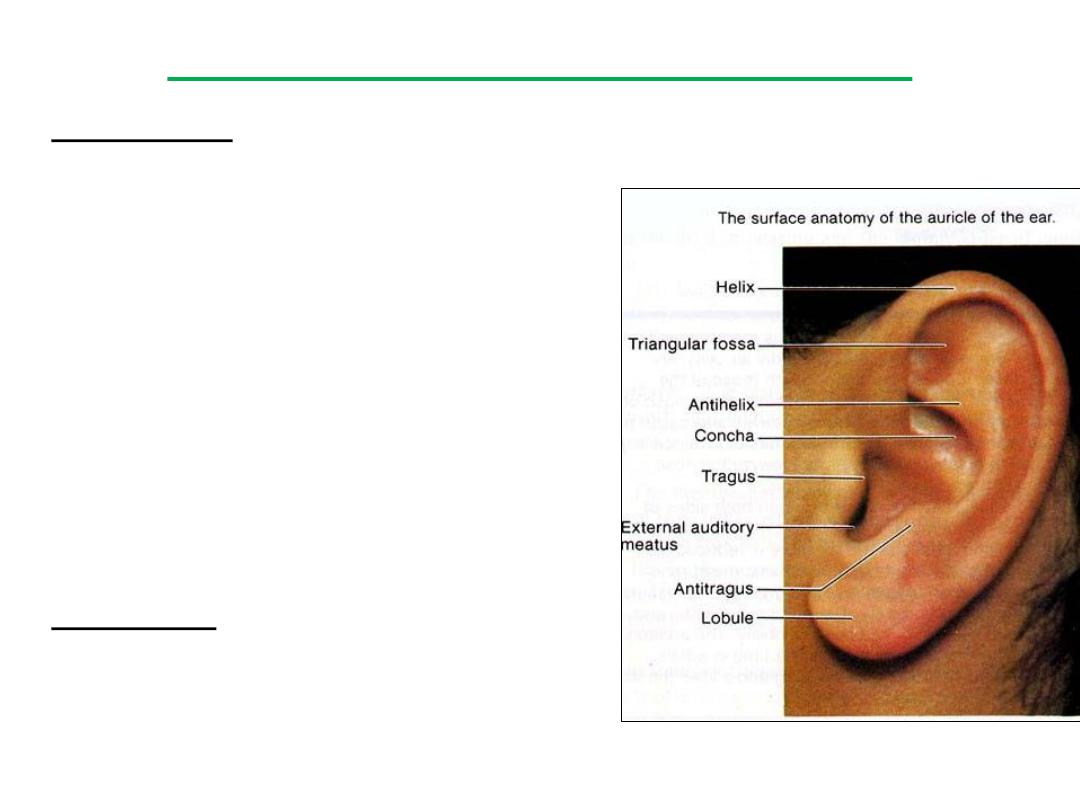
• Inspection
Pinna: look for lesions, abnormal
appearance or position
Canal: discharge, swelling, redness, wax,
foreign bodies
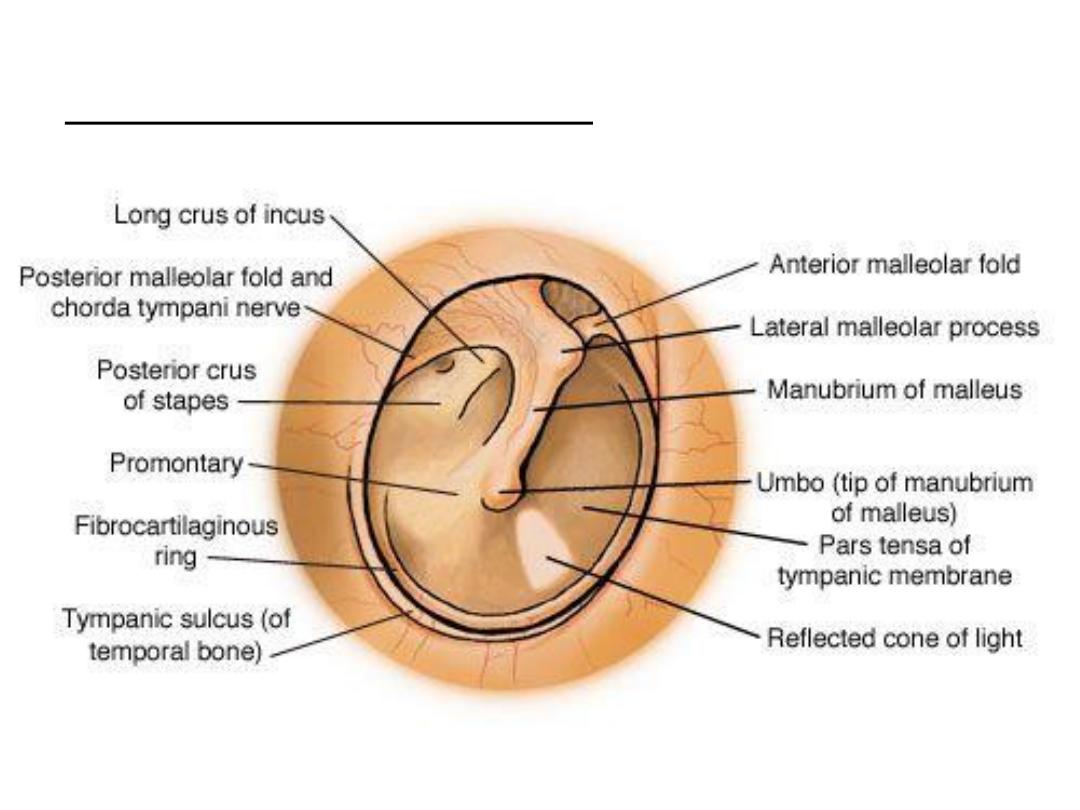
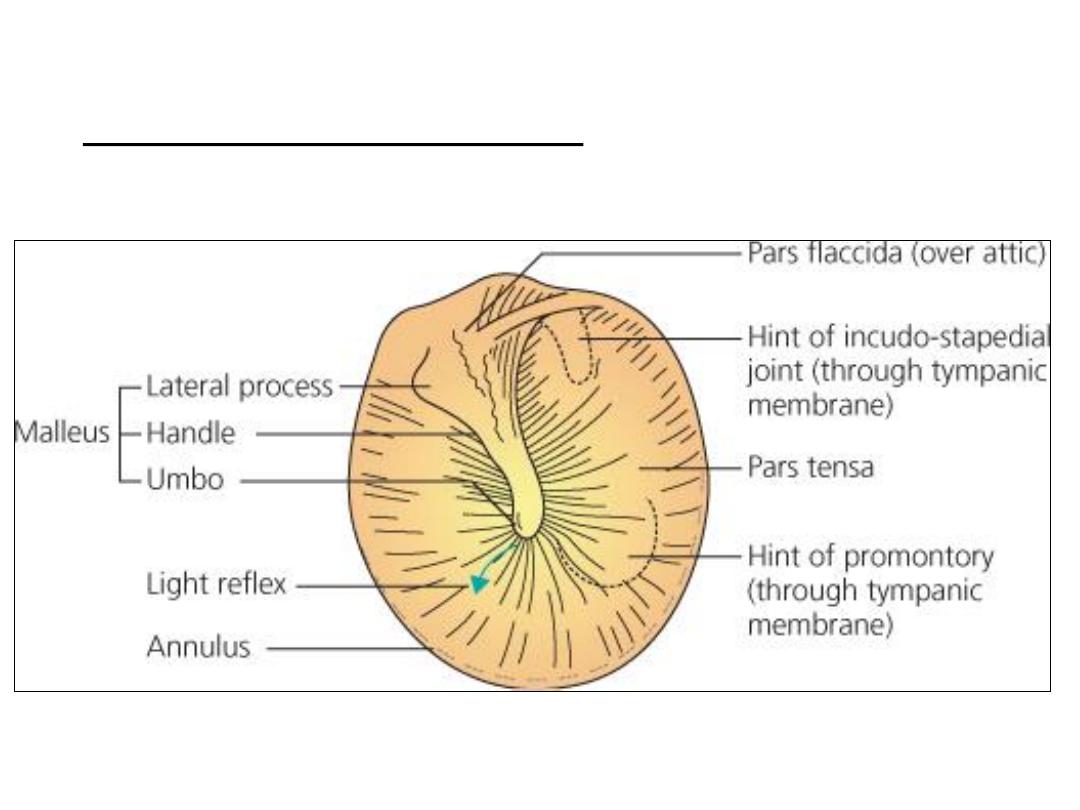
Tympanic membrane: colour, light reflex,
landmarks, bulging or retraction, scarring,
perforation, air bubbles, fluid level
Estimate hearing with watch or whisper
test. If whisper test fails, perform Weber
& Rinne tests with a 512 hertz tuning fork
• Palpation
Tenderness over tragus or on
manipulation of the pinna & Tenderness
on tapping of mastoid process
Inspection & palpation
Size and tenderness of pre, post auricular and occipital nodes

Test for Eustachian Tube
Function
1. Valsalva Maneuver:
• Method: After taking a deep breath, the patient pinches his nose
and closes his mouth in an attempt to blow air in his ears. Otoscopy
shows movement of the drum.
• Note: Failure of this test does not prove pathologic occlusion of
• the tube.
• This maneuver in the presence of nasal and nasopharyngeal
infection carries the danger of transmission of infection to the ear.
2. Toynbee's test:
• It is safer and confirms normal tubal function.
• Method: The nose is closed and the patient swallows. There is in
drawing of the tympanic membrane, confirmed by otoscopy.
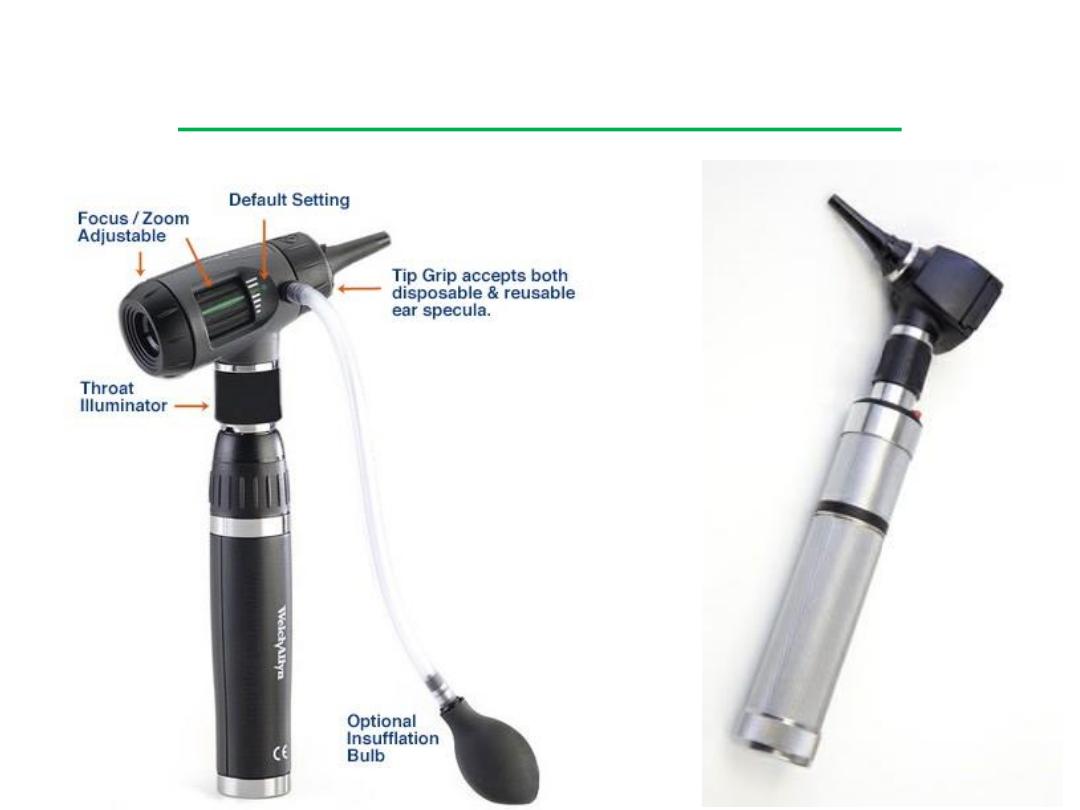
Otoscope (auroscope)
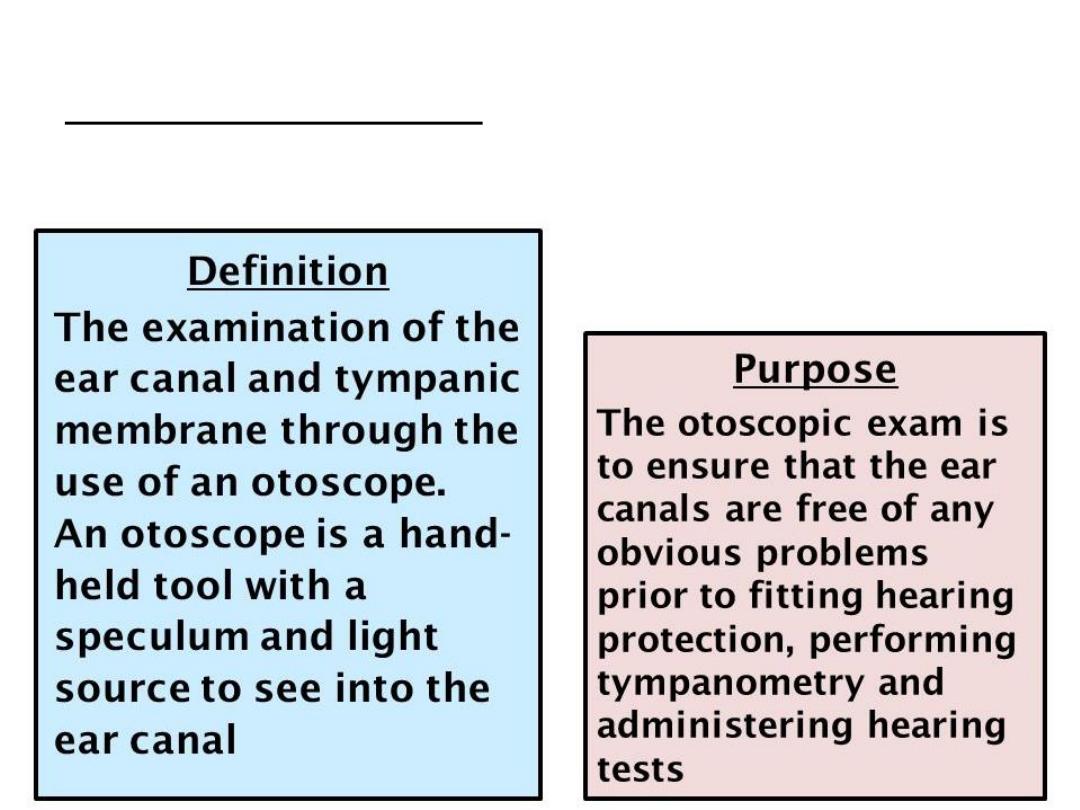
Definition & purpose

Uses

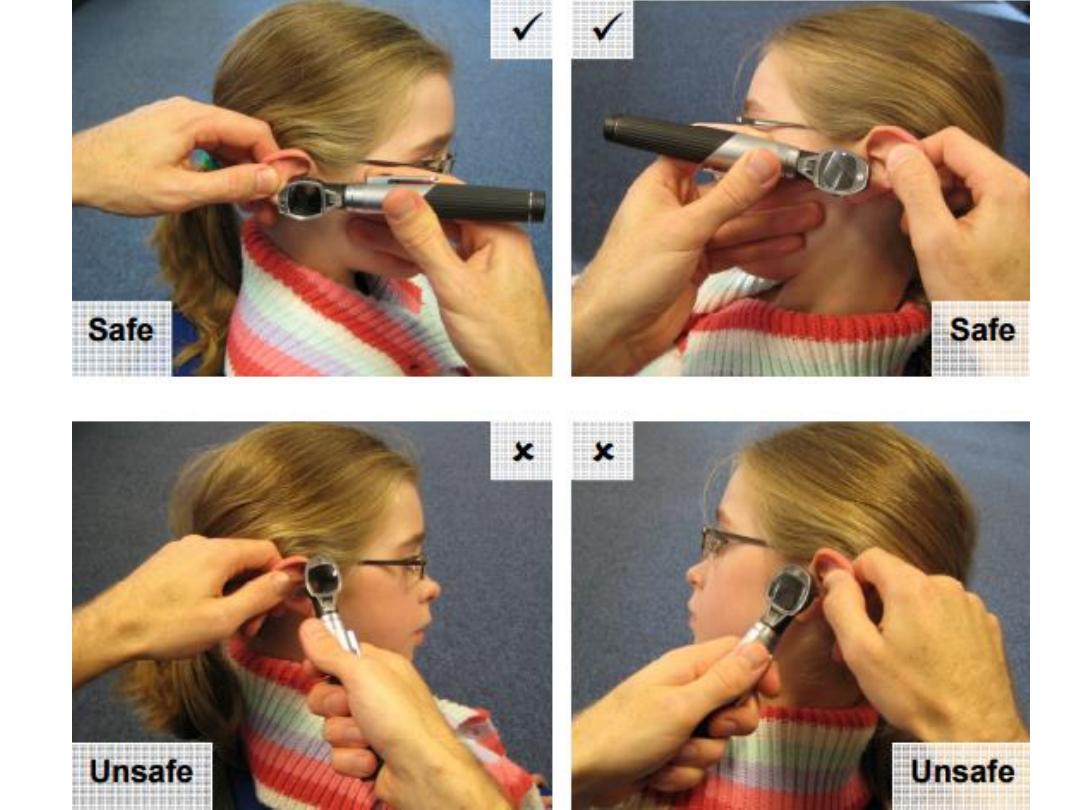
Procedure
• The examiner should adopt a stable position when examining the
ear using an otoscope & carefully guide the tip of the speculum
(attached to the otoscope) into the ear canal while observing the
ear.
• The examination of the ear canal and tympanic membrane should
be conducted carefully and safely, taking into account the size,
shape, orientation and condition of the ear canal and the presence
of wax or foreign bodies.
• It should also take into account that the bony portion of the ear
canal is especially sensitive and its surrounding skin vulnerable to
trauma.
• On completing the examination, the otoscope (including the
speculum) shall be removed from the ear canal.

• The auroscope should be held in the left hand when examining the
left ear and in the right hand when examining the right ear.
• The external auditory meatus (EAM; ear canal) should be
straightened by gently lifting the pinna upwards and backwards.
• Choose the largest speculum that will comfortably fit into the ear
canal, since this will give the best view and admit the most light.
• Then the auroscope is gently inserted along the line of the ear
canal. As with all examinations, try to be methodical. Note, in turn,
the skin of the ear canal, the pars tensa with the handle and lateral
process of the malleus, and the light reflex.
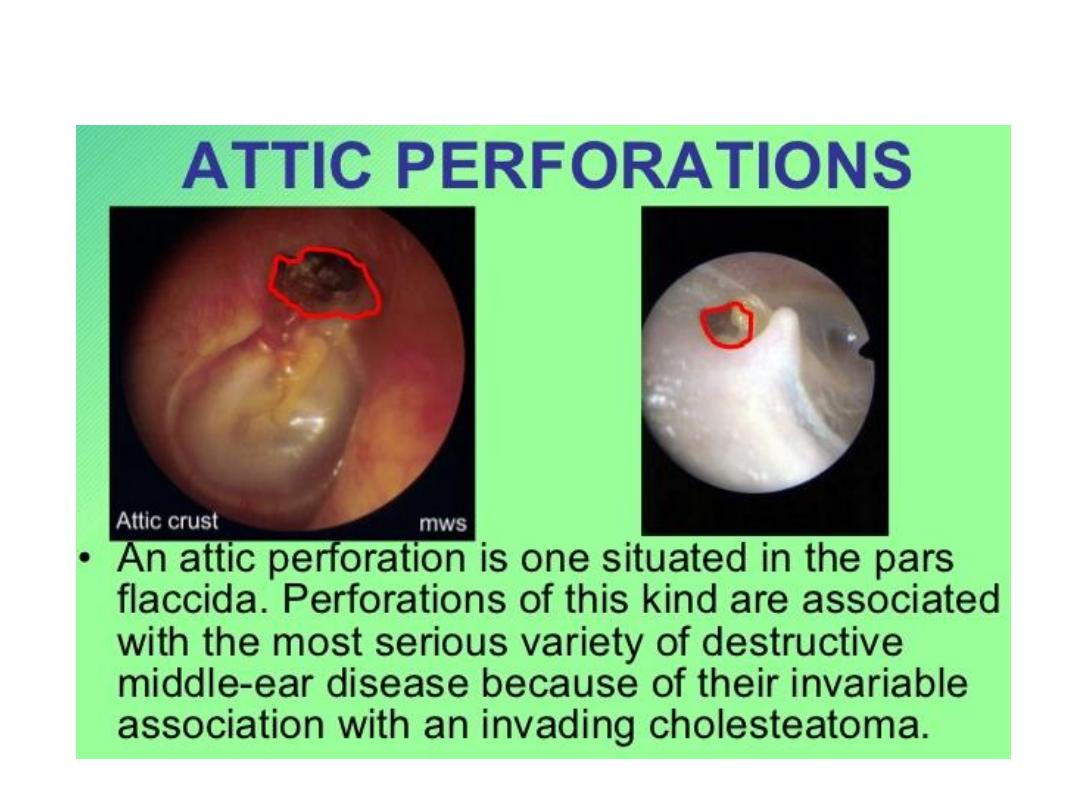
• It is important to pay particular attention to the tiny strip at the top
of the ear drum known as the pars flaccida, since it is in this area
that cholesteatomas are first seen.
• Some auroscopes have a pneumatic bulb that can be attached. This
allows air to be puffed in and out of the ear canal, and with
experience the examiner can learn to assess the mobility of the
drum.
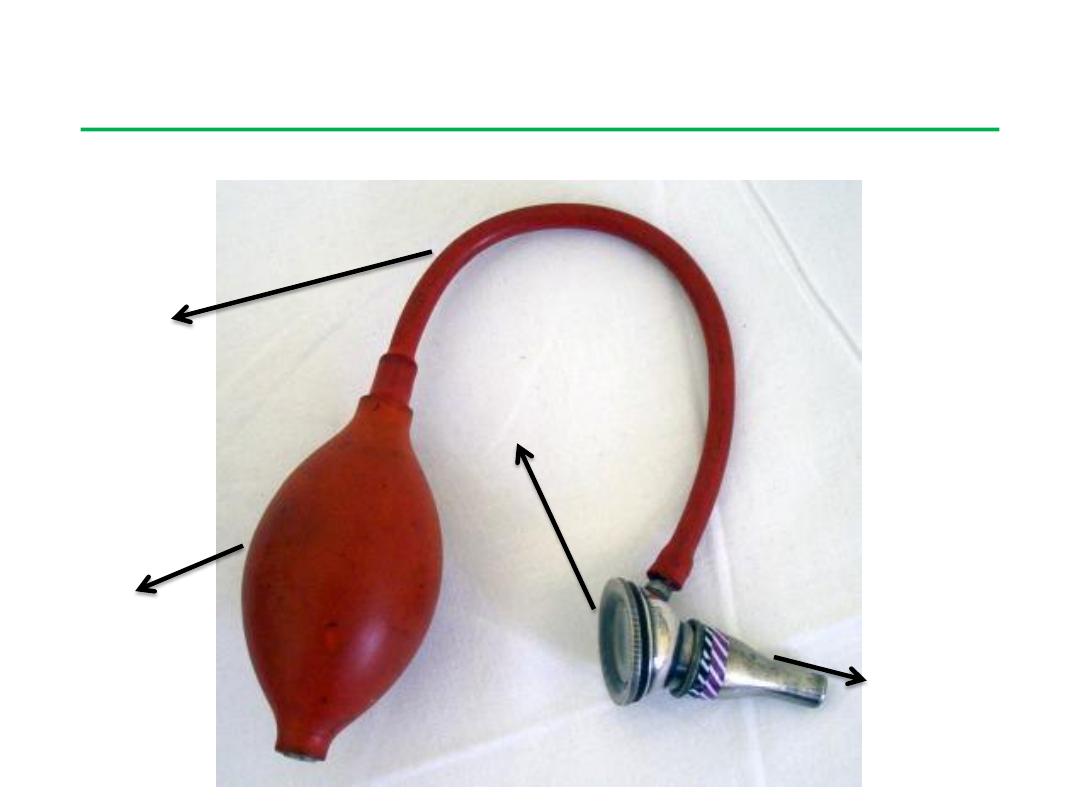
Sigle's pneumatic speculum
eye piece
aural speculum
bulb
rubber tube

Parts of siegel's pneumatic speculum
has an eye piece which has a magnification of 2.5 times. It is a convex
lens. The eye piece is connected to a aural speculum. A bulb with a
rubber tube is provided to insufflate air via the aural speculum.
The advantages of this aural speculum is that it
provides a magnified view of the ear drum,
the pressure of the external canal can be varied by pressing the
bulb thereby the mobility of ear drum can be tested.
Since it provides adequate suction effect, it can be used to suck out
middle ear secretions in patients with CSOM.
Ear drops can be applied into the middle ear by using this
speculum. Ear is first filled with ear drops and a snugly fitting
siegel's speculum is applied to the external canal. Pressure in the
external canal is varied by pressing and releasing the rubber bulb,
this displaces the ear drops into the middle ear cavity.
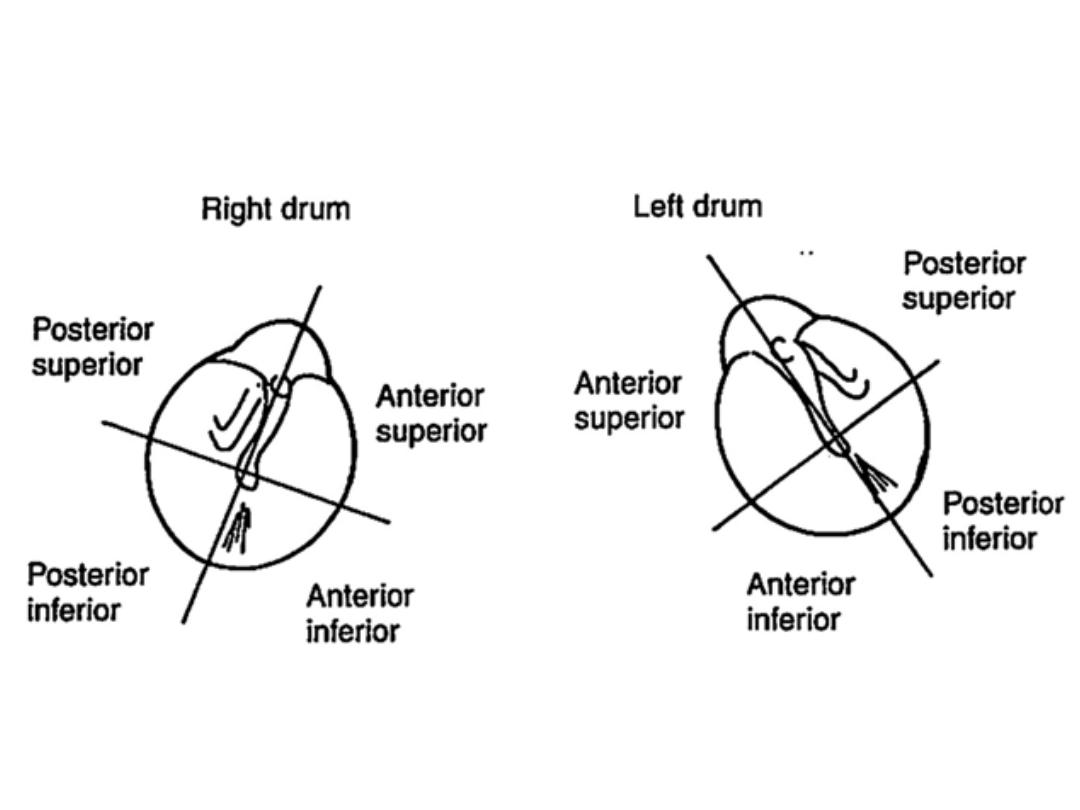
Right tympanic membrane
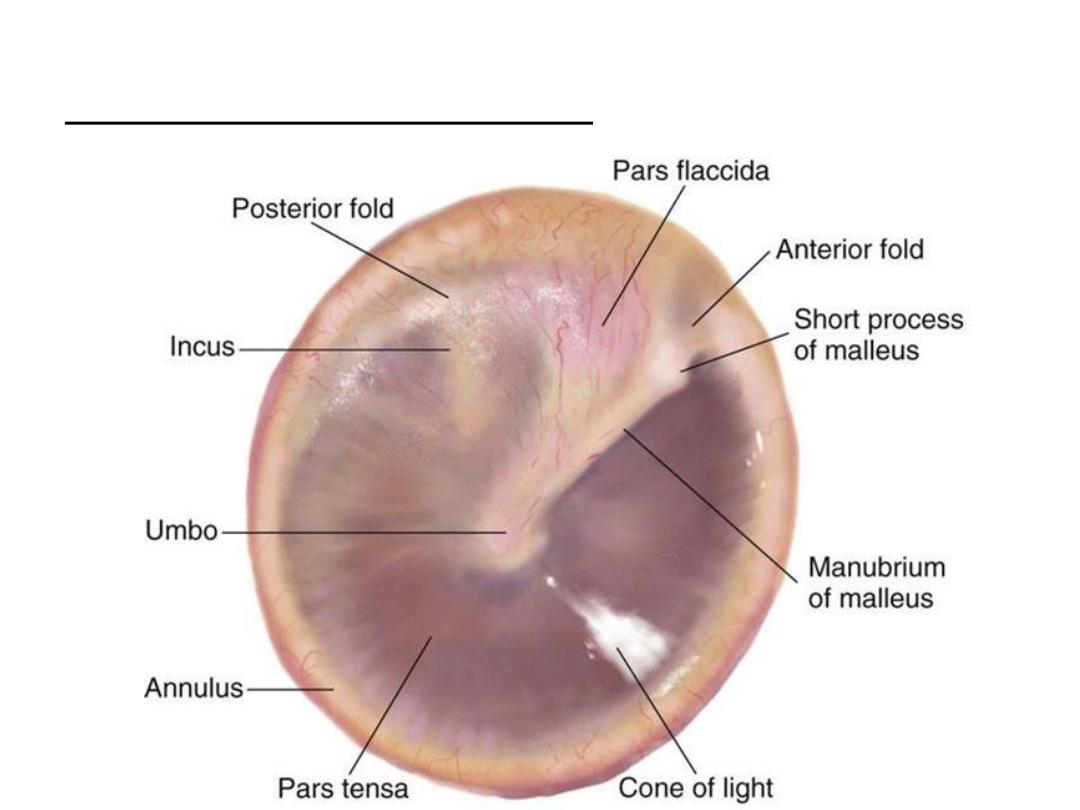
Right tympanic membrane
Left tympanic membrane
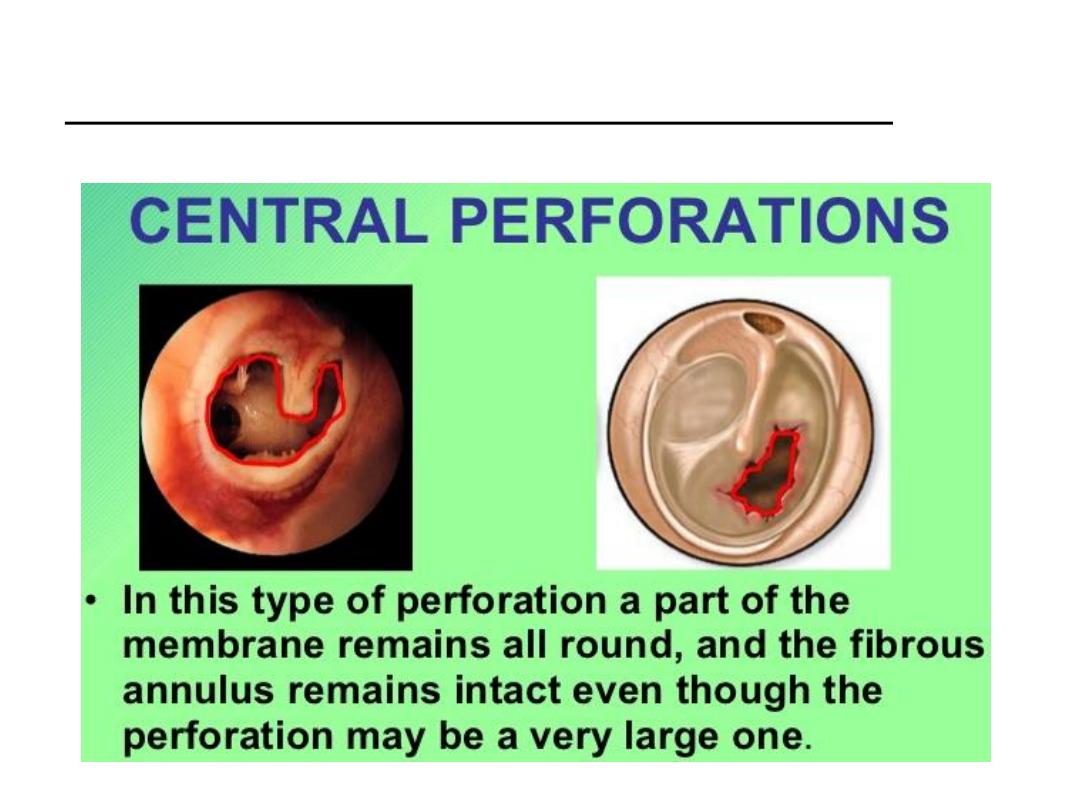
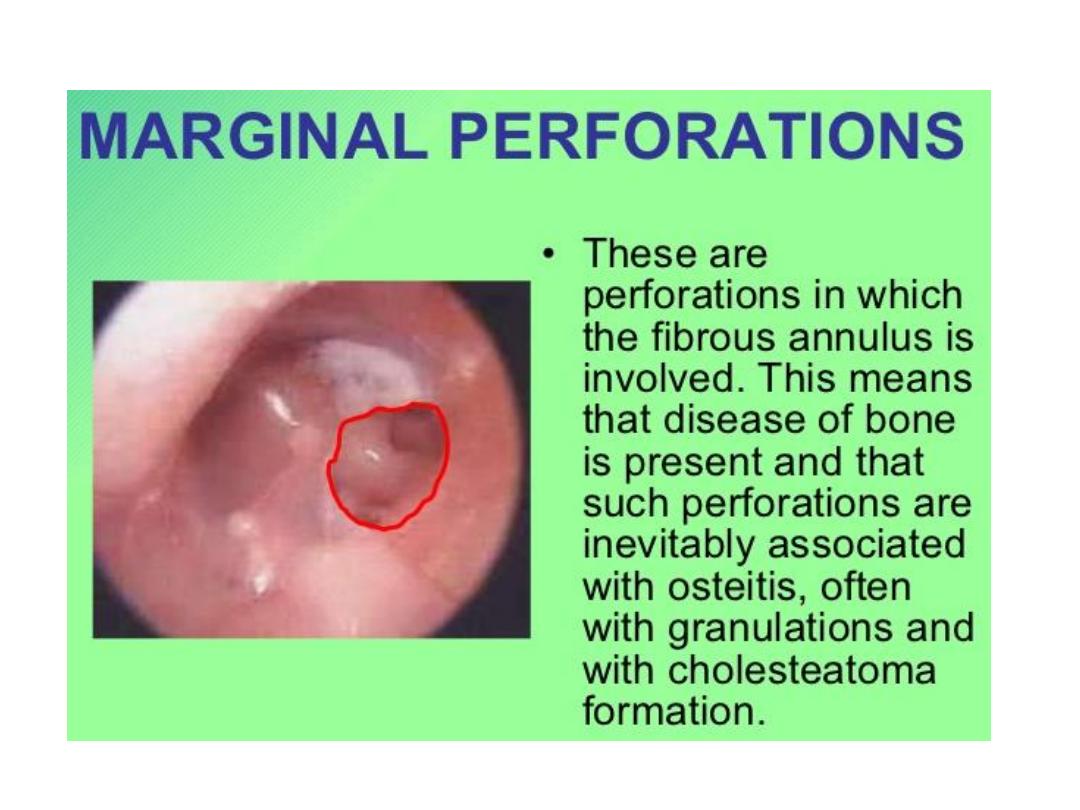
Types of tympanic membrane perforation
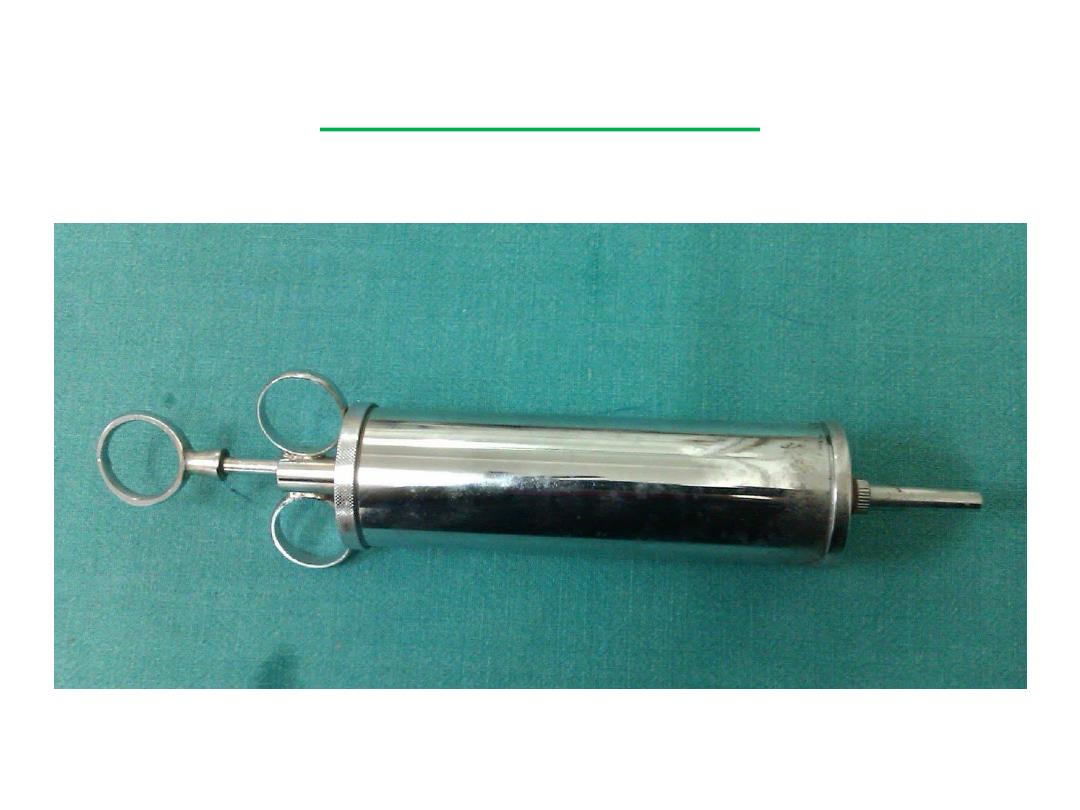
Aural Syringe

• This instrument is the metallic aural syringe, an instrument used for
syringing of the ear, an OPD procedure.
• Indications for ear syringing:
Wax removal
Foreign body removal Removal of otomycotic debris
• The syringe has a nozzle for insertion into the external auditory
canal. Water at body temperature is loaded into the syringe. The
syringe is held by inserting fingers into the rings at the back. The
third ring is on the piston that forces the water out when pushed.
• More Information:
Syringing should be avoided in case of perforated tympanic
membrane.
Aural syringing can result in complications like trauma to the
external auditory canal and perforation of the tympanic membrane.
Other methods of wax and foreign body removal include manual
removal using the Jobson-Horne wax hook, suction and removal
under microscope.
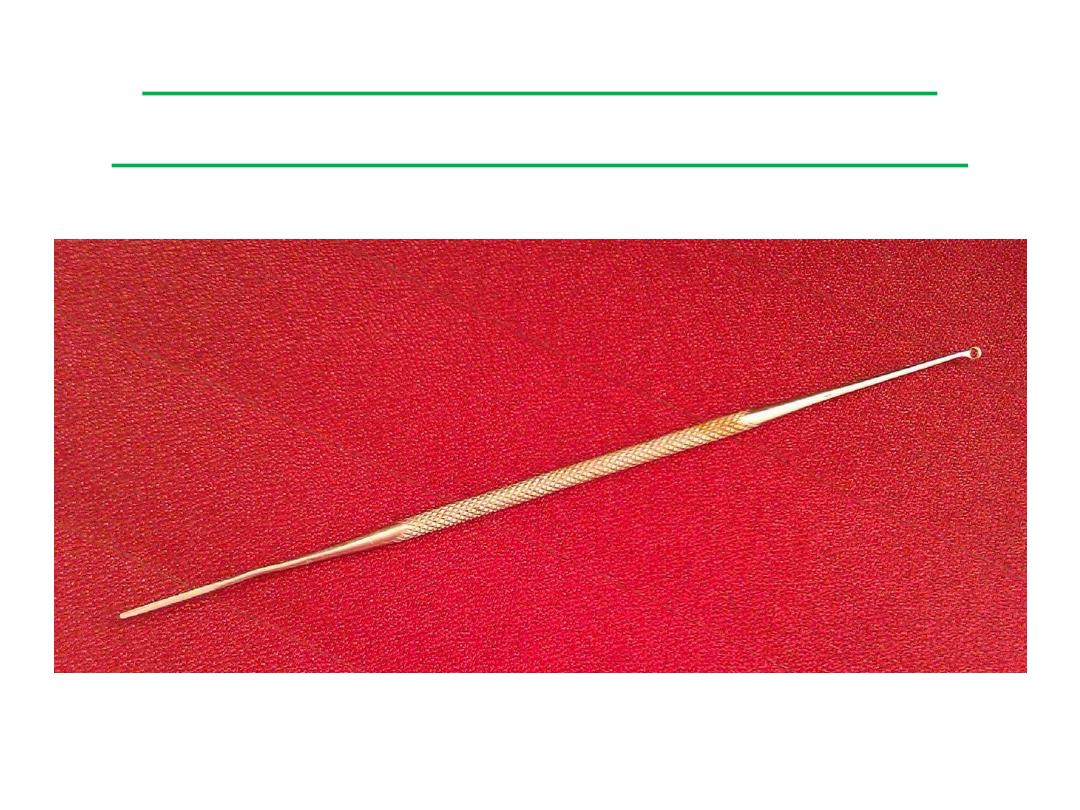
Jobson-Horne Ear Probe
(wax hook or ring curette)

• Uses:
Ear wax removal Removal of foreign body from the ear
Removal of otomycotic debris or discharge from the external
auditory canal
Probing of aural polyp or other mass in the ear canal
Probing of nasal masses and checking their sensitivity to touch
• If you look closely, you will find that one end of the probe is shaped
like a ring. This end may be used to hook out wax or foreign bodies
from the ear canal. The other end of the instrument is sharp and
serrated. An ear wick can be fashioned out of this end by rolling
cotton on to it and used to mop ear discharge.
• More Information:
If wax in the ear canal is impacted, it is better to first soften it with
wax-softening or dissolving agents and then attempt to remove it.
Wax in the ear canal can also be removed by syringing using
an aural syringe or by using suction apparatus under microscopic
visualization.
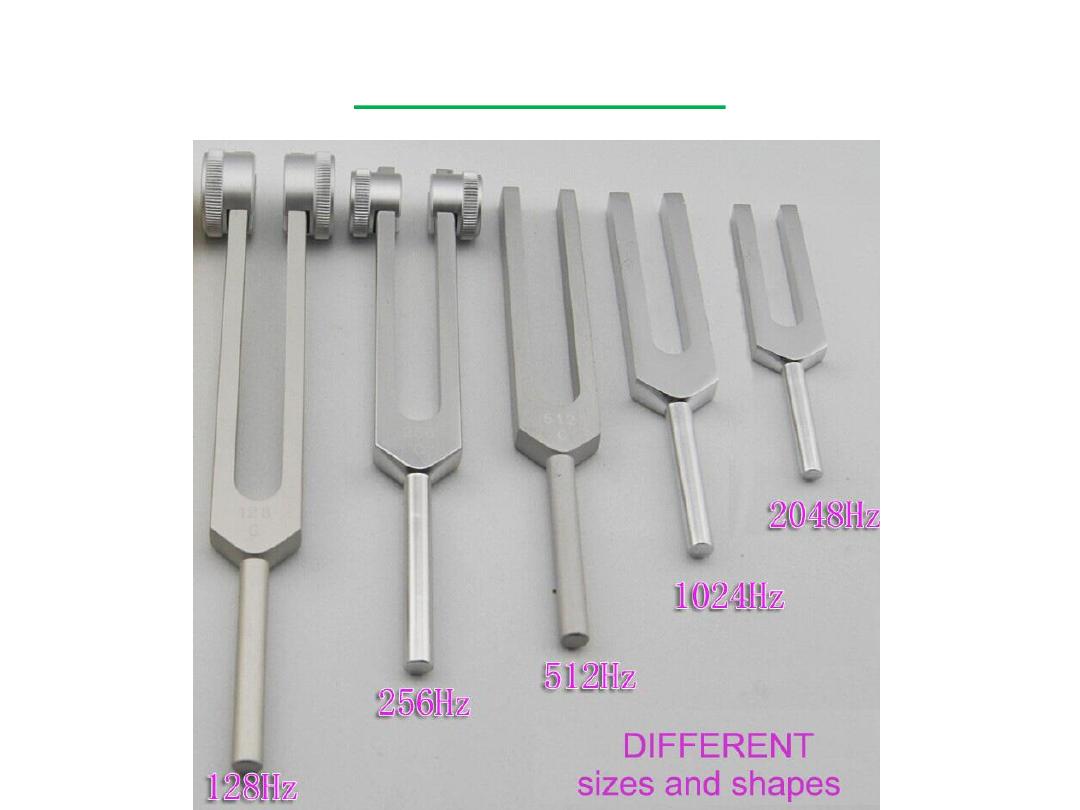
Tuning fork

• In ENT, tuning forks are used to clinically test hearing and identify
the type of hearing loss.
• The parts of a tuning fork are:
Base plate or footplate
Shaft
Prongs that vibrate producing sound
• If you look at the shaft or the footplate closely, you will find it
carries a number - this is the frequency at which the tuning fork
vibrates and is denoted in Hertz (Hz). The commonly used tuning
forks to test hearing are 256 Hz, 512 Hz and 1024 Hz. These
frequencies correspond to the speech frequencies. Tuning forks of
lower frequencies (like 128 Hz) produce vibrations that are felt
more than they are heard, while those of higher frequencies
produce more overtones.

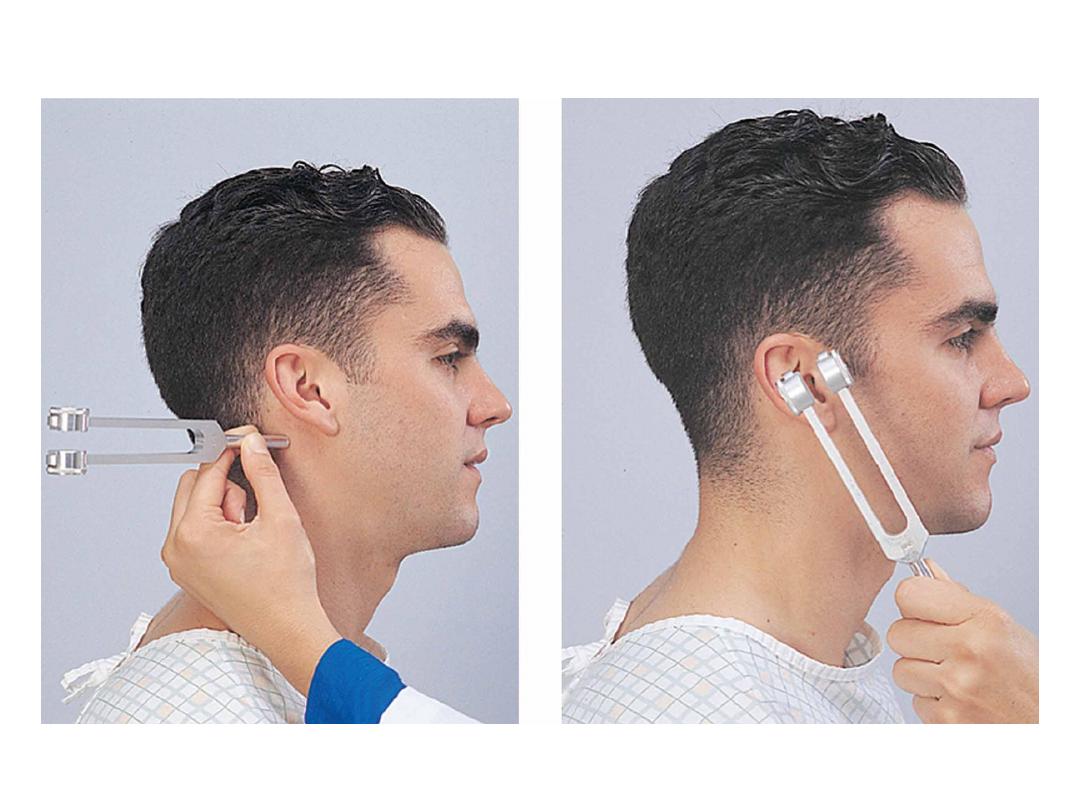
Rinne test
• is a hearing test, primarily for evaluating loss of hearing in one ear
(unilateral hearing loss). It compares perception
of sounds transmitted by air conduction to those transmitted
by bone conduction through the mastoid. Thus, one can quickly
screen for the presence of conductive hearing loss.
• A Rinne test should always be accompanied by a Weber test to also
detect sensorineural hearing loss and thus confirm the nature of
hearing loss.
• Procedure: is performed by placing a high frequency (512 Hz)
vibrating tuning fork against the patient's mastoid bone and asking
the patient to tell you when the sound is no longer heard. Once
they signal they can't hear it, quickly position the still vibrating
tuning fork 1–2 cm from the auditory canal, and again ask the
patient to tell you if they are able to hear the tuning fork.

• Results
Normal Hearing: Air conduction should be greater than bone
conduction and so the patient should be able to hear the tuning fork
next to the pinna (outer ear) after they can no longer hear it when held
against the mastoid.
Abnormal Hearing:
o If they are not able to hear the tuning fork after the mastoid test, it
means that their bone conduction is greater than their air conduction.
This indicates there is something inhibiting the passage of sound waves
from the ear canal, through the middle ear apparatus and into the
cochlea (i.e., there is a conductive hearing loss).
o In sensorineural hearing loss the ability to sense the tuning fork by
both bone and air conduction is equally diminished, implying they will
hear the tuning fork by air conduction after they can no longer hear it
through bone conduction. This pattern is similar to what is found in
people with normal hearing, but patients with sensorineural hearing
loss will indicate that the sound has stopped much earlier. This can be
revealed by the investigator (with normal hearing) placing the fork close
to her own ear after the patient indicates that the sound has subsided,
noting that the sound from the fork is still loud & clear to a normal ear.

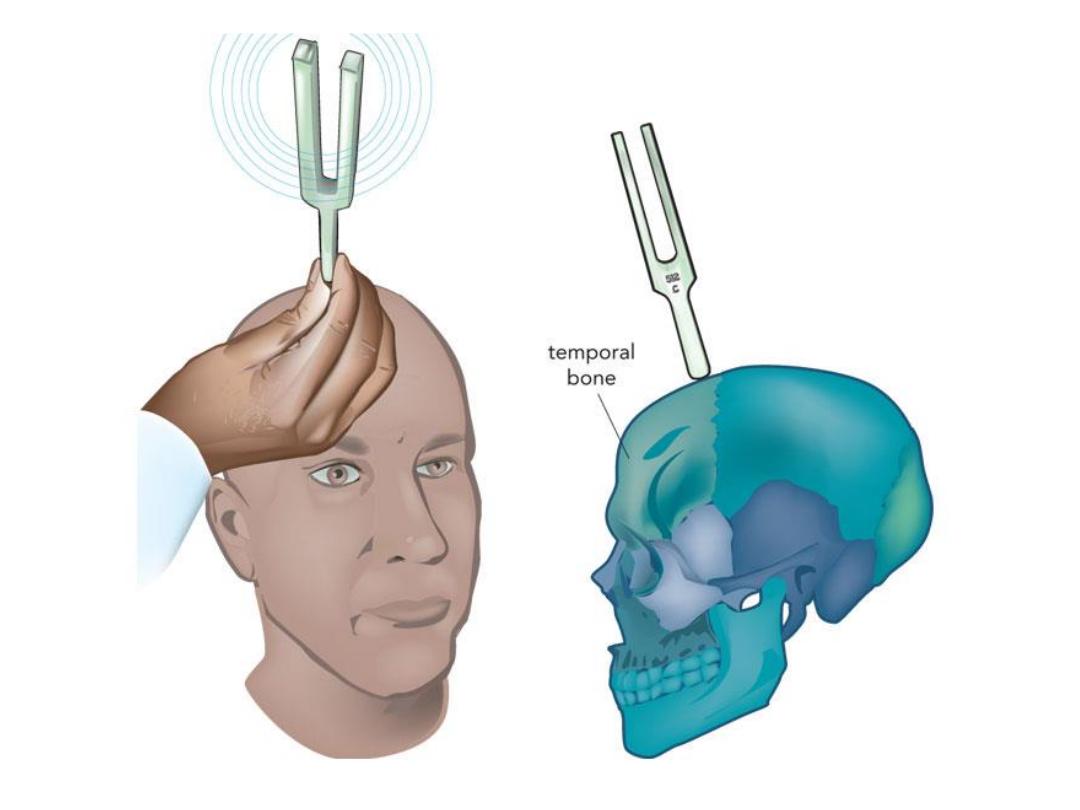
Weber test
• The Weber test is a quick screening test for hearing. It can
detect unilateral (one-sided) conductive hearing loss (middle ear
hearing loss) and unilateral sensorineural hearing loss (inner ear
hearing loss).
• Procedure
The Weber and the Rinne test are typically performed together
with the results of each combined to determine the location and
nature of any hearing losses detected.
In the Weber test a vibrating tuning fork (Typically 256 Hz or
512 Hz used for Weber vibration test) is placed in the middle of the
forehead, above the upper lip under the nose over the teeth, or on
top of the head equi-distant from the patient's ears on top of thin
skin in contact with the bone. The patient is asked to report in
which ear the sound is heard louder.

• Results
A normal weber test has a patient reporting the sound heard
equally in both sides.
In an affected patient,
o if the defective ear hears the Weber tuning fork louder, the finding
indicates a conductive hearing loss in the defective ear.
o if the normal ear hears the tuning fork sound better, there is
sensorineural hearing loss on the other (defective) ear.
However, the foregoing presumes one knows in advance which ear
is defective and which is normal (such as the patient telling the
clinician that they cannot hear as well in one ear versus the other)
and the testing is being done to characterize the type, conductive
or sensorineural, of hearing loss that is occurring. In the case where
the patient is unaware or has acclimated to their hearing loss, the
clinician has to use the Rinne test in conjunction with the Weber to
characterize and localize any deficits. That is, an abnormal Weber
test is only able to tell the clinician that there is a conductive loss in
the ear which hears better or that there is a sensorineural loss in
the ear which does not hear as well.
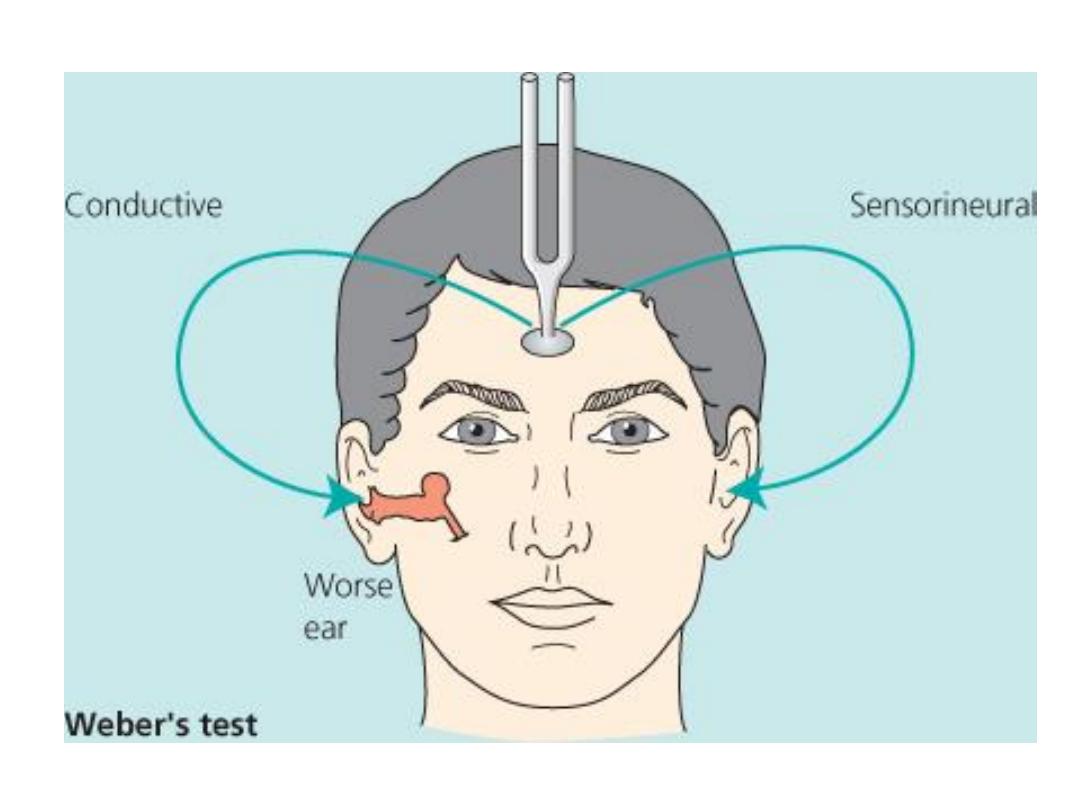
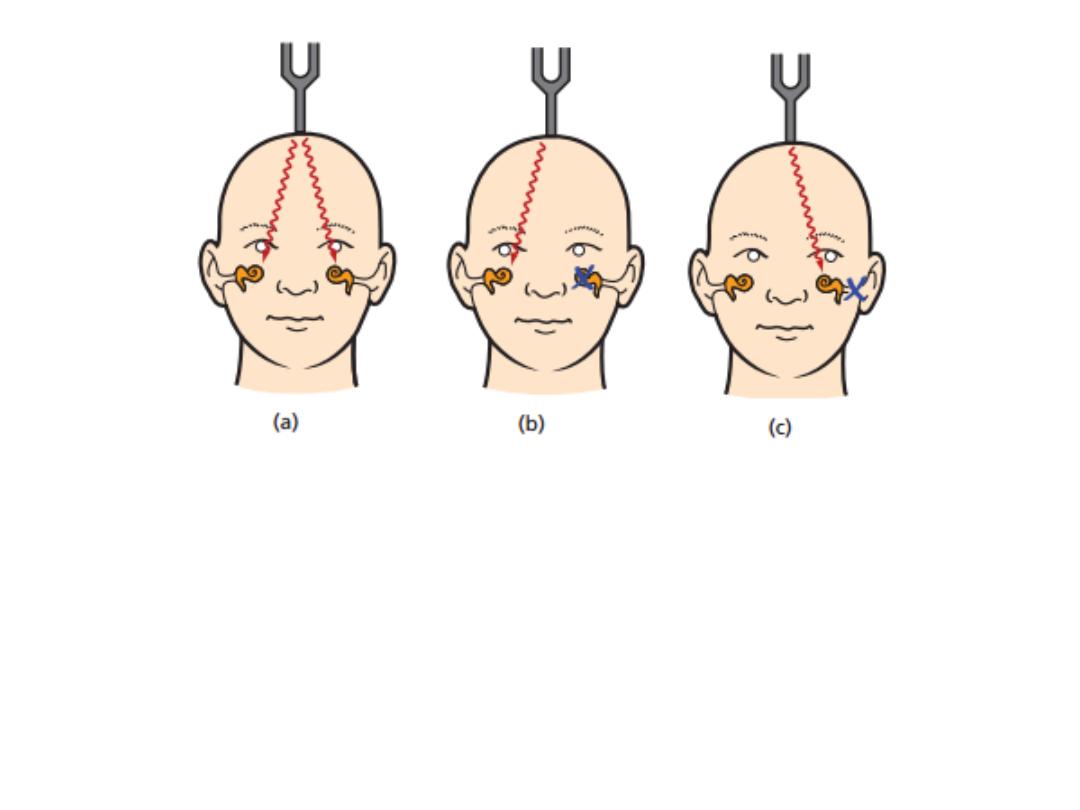
Figure 1.9 Weber test.
(a) Sound is localized centrally with equivalent hearing in both ears.
(b) Unilateral sensorineural deafness localizes sound to the better-hearing
side.
(c) Unilateral conductive deafness localizes sound to the same side.

Examination of
the nose &
paranasal sinuses

Assessment of function
airway resistance and
occasionally sense of smell
• looking into the mouth and pharynx. Common symptoms of nasal
disease include:
Airway obstruction, Rhinorrhoea (runny nose), Sneezing.
Loss of smell (anosmia), Facial pain caused by sinusitis.
Snoring (associated with nasal obstruction).
• Check patency of each side and ask the patient to sniff. To assess
the nasal airway hold a cold metal tongue compressor under the
nose while the patient exhales and note the condensation under
both nostrils, or occlude one nostril whilst the patient sniffs to give
a reasonable idea of airway patency.

Inspection, palpation &
percussion
• Inspection
External: inflammation, deformity, discharge or bleeding, crusting
Internal: colour of mucosa, edema, deviated or perforated septum,
polyps, bleeding
Observe nasal versus mouth breathing, Scars or abnormal creases.
Redness (evidence of skin disease), Offensive smell.
The nose can be inspected from the front to examine the anterior
nares by lifting the tip of the nose up and looking inside without a
speculum.
Check for inflammation (rhinitis), position of the septum & presence
of polyps (touch to check sensitivity; it should be insensitive to
touch). A foreign body, usually accompanied by an offensive
unilateral discharge, may be seen inside the nose of a child.

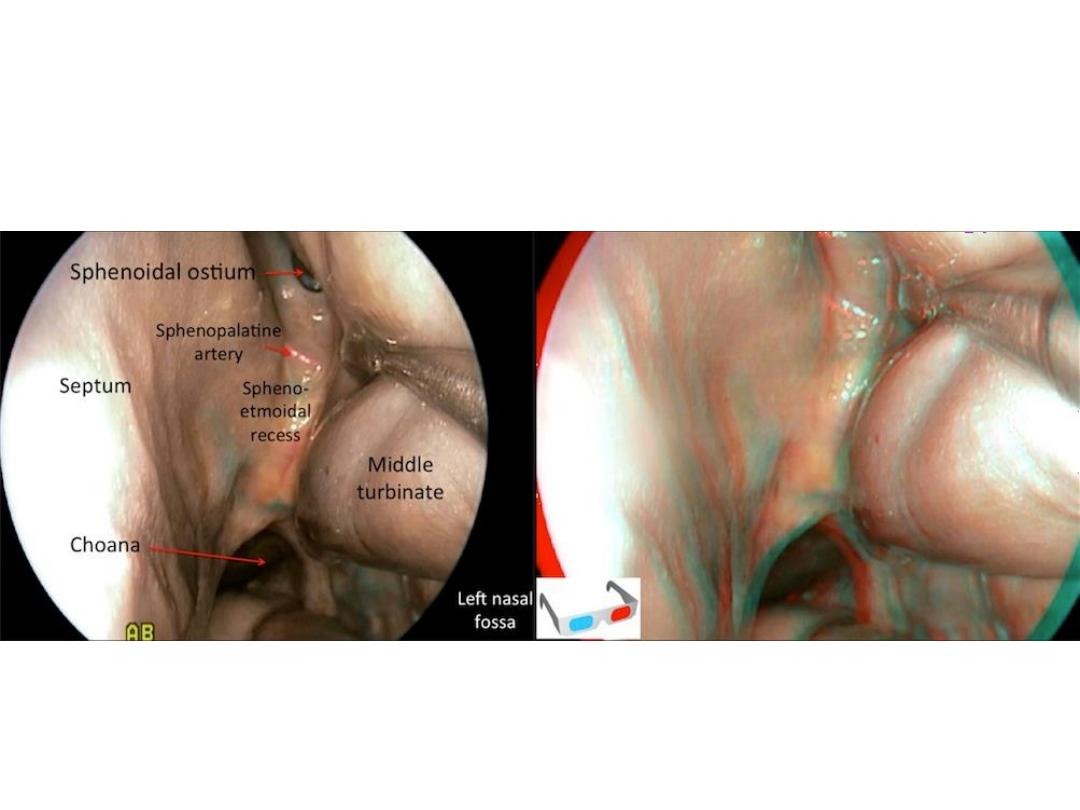
A mirror and headlight or an endoscope instrument are used to
view the nasopharynx (the postnasal space, which contains the
Eustachian tube orifices and pharyngeal recess (of Rosenmüller)
and may contain adenoids or nasopharyngeal cancer), but this is
not always possible during a routine examination. Finally, examine
the palate. Look for large nasal polyps and tumours arising from
the soft palate.
• Palpation
Sinus and nasal tenderness
• Percussion
Sinus and nasal tenderness

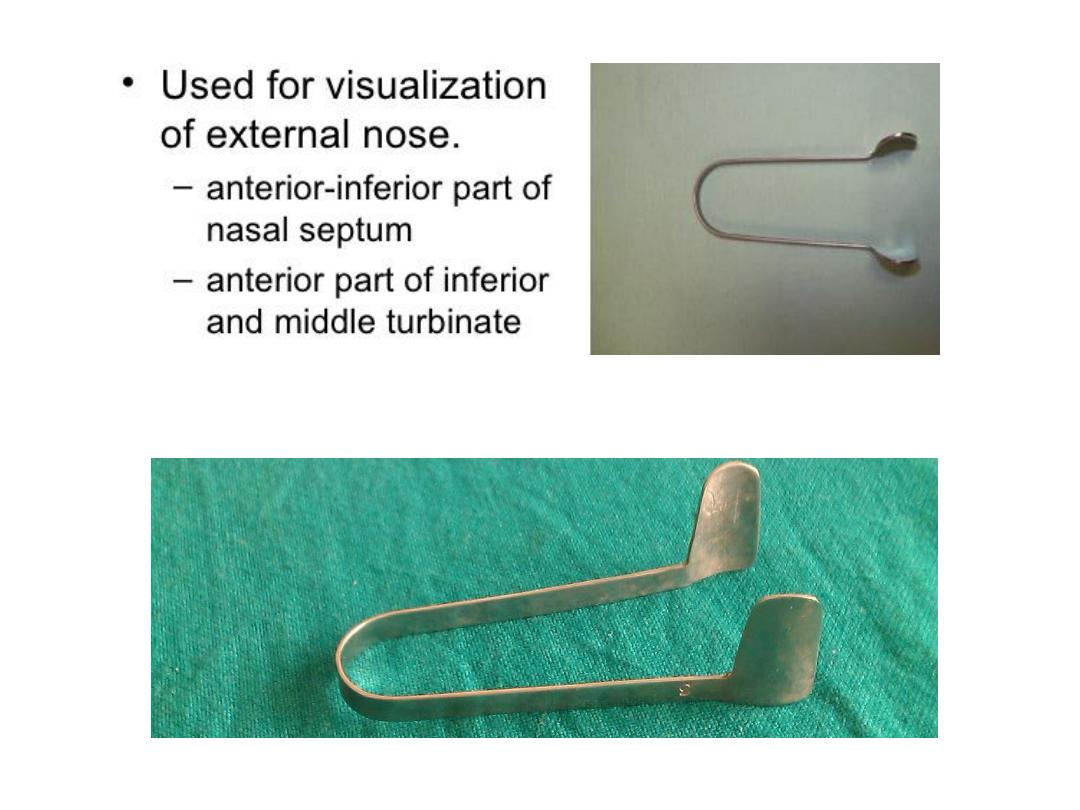
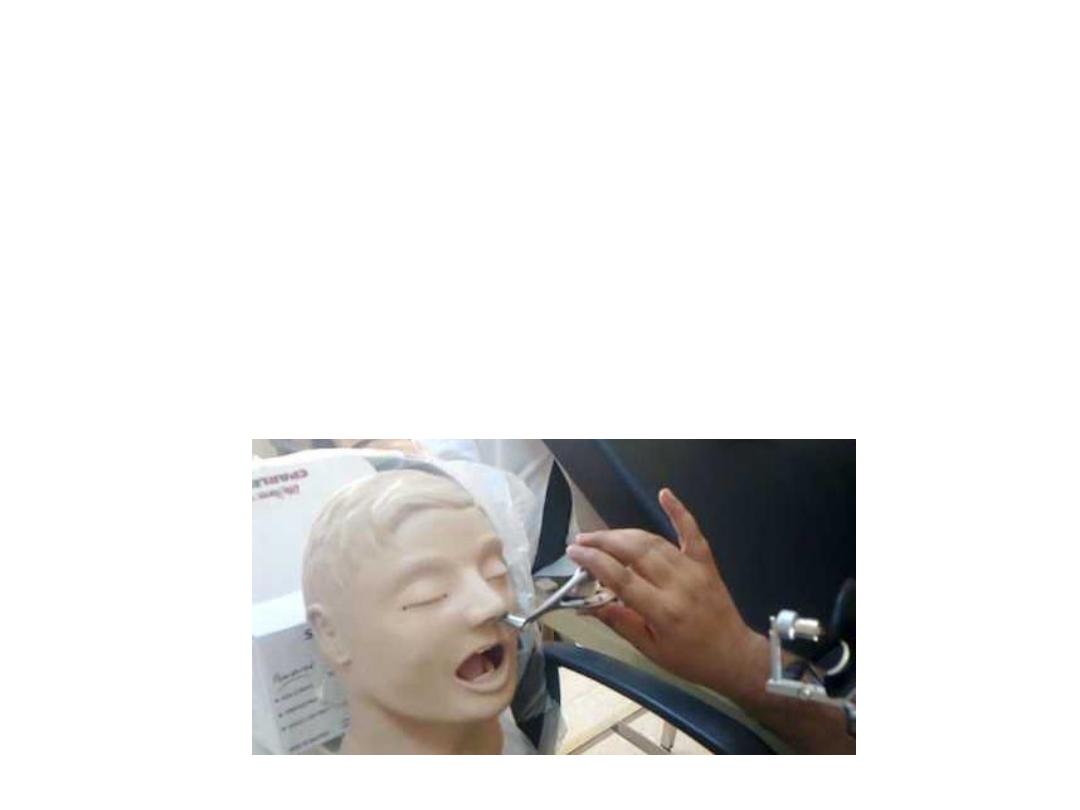
Thudichum’s nasal speculum
• is an instrument routinely used in the outpatient to examine the
nose. The instrument has 2 flanges that can be inserted into the
nostril during anterior rhinoscopy. The flanges widen to open up
the nasal cavity, offering a better view of the structures inside the
nose.
• Uses of the Thudichum’s nasal speculum:
In anterior rhinoscopy
Foreign body removal from the nose
Peroperatively, for nasal packing
In septal surgeries (septoplasty and SMR) while making the incision
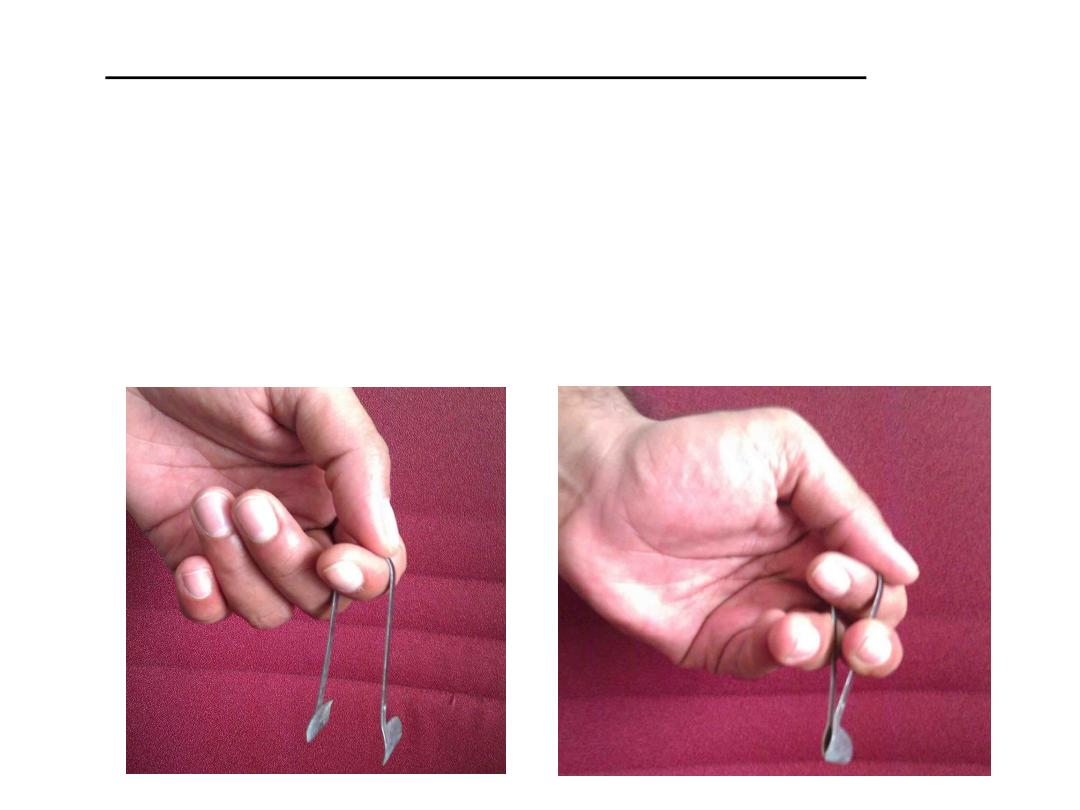
• How to use the Thudicum’s nasal speculum:
First, hold the instrument at its bend with your thumb & index
finger. Then, place your middle and ring fingers either side of the
limbs of the speculum. Bringing these fingers close to each other
will also bring the flanges of the speculum close together. Insert the
instrument into the nostril in this position. Moving your middle and
ring fingers apart will widen the flanges of the speculum, opening
up the nasal cavity in the process.

• More Information:
Insert the speculum fully closed into the nasal cavity, but keep the
flanges slightly open while drawing the speculum out to avoid
pulling any vibrissae!
Practice using the Thudicum’s speculum during your clinical posting,
the method described above is the optimal way to best visualize the
nasal cavity.
Structures seen on anterior rhinoscopy:
o Nasal septum
o Lateral wall of the nose including the turbinates and the meati
o Floor of the nasal cavity
Do not use the nasal speculum to examine the vestibule. Just lift up
the tip of the nose with your finger to look at the vestibule of the
nose, using the speculum will only obscure it from your vision.
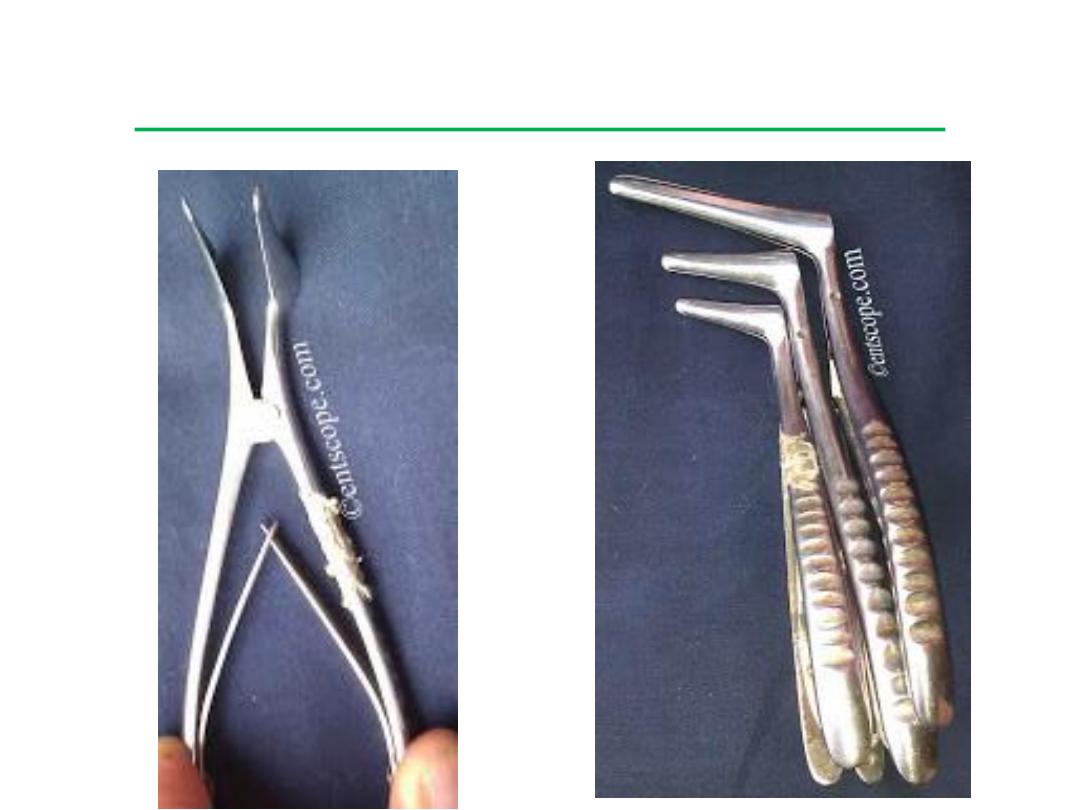
Killian’s Nasal Speculum
• This is one variety of nasal speculum and is used for both nasal
examination and surgery.
• It comes in several sizes, from small to long-bladed. A screw in the
handle can be tightened to hold the blades of the speculum in the
open position. This gives the speculum its self-retaining feature,
very useful during septal surgery.
• Unlike the Thudichum’s nasal speculum, this instrument is much
easier to handle. The blades are attached to handles which can be
used to open and close the speculum.

• Uses
Anterior rhinoscopy
Anterior nasal packing
Septoplasty
Polypectomy
Nasal foreign body, rhinolith removal
Turbinate reduction surgeries
• More information
In septoplasty, the mucoperichondrial flap is only raised on one side
of the septal cartilage, whereas in SMR it is raised on both sides of
the septum.
Tearing the mucoperichondrial flaps in corresponding places on
both sides of the septum can result in a septal perforation
postoperatively.
A septal hematoma occurs when blood collects between the septal
cartilage and its mucoperichondrium.
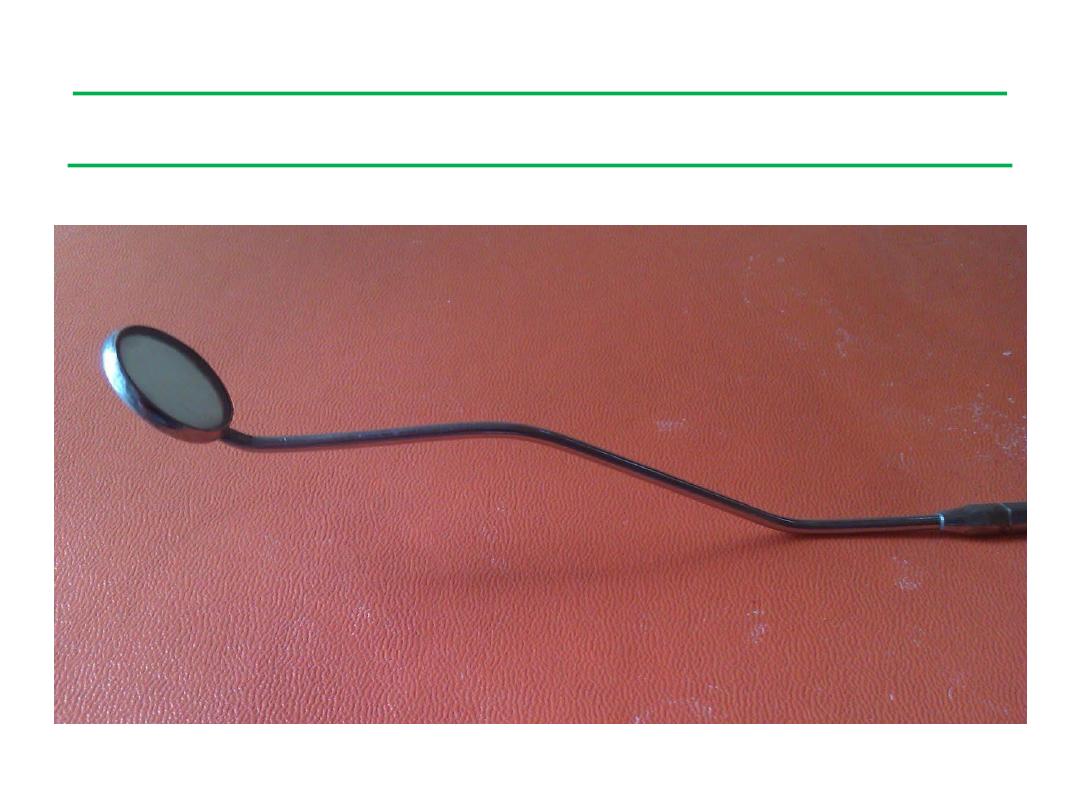
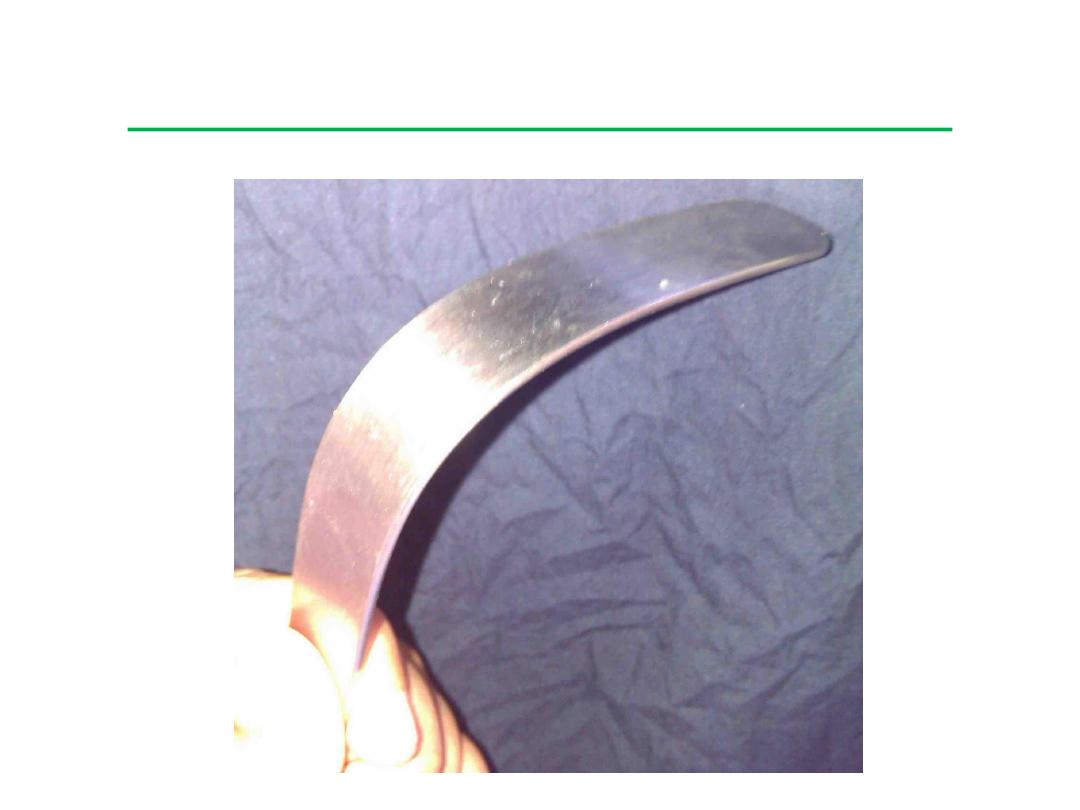
Posterior nasal space mirror
(posterior rhinoscopy mirror)

• The shaft of the instrument is bent to achieve a bayonet shape, a
feature that helps differentiate it from the indirect laryngoscopy
mirror. The mirror is available in 5 sizes.
• Uses & procedure:
Examination of the post nasal space by a procedure called posterior
rhinoscopy, an out-patient procedure.
The mirror is warmed and introduced into the oral cavity while the
tongue is depressed with a tongue depressor. The mirror is turned
upwards in order to examine the post nasal space.
• More Information:
Posterior rhinoscopy is done to look for lesions in the post nasal
space - for example, adenoids, tumours of the nasopharynx, etc.
Diagnostic nasal endoscopy is the best method to examine this
region.
In small children who may be uncooperative for posterior
rhinoscopy or nasal endoscopy, X-ray of the skull, lateral view, may
be used to rule out adenoids.
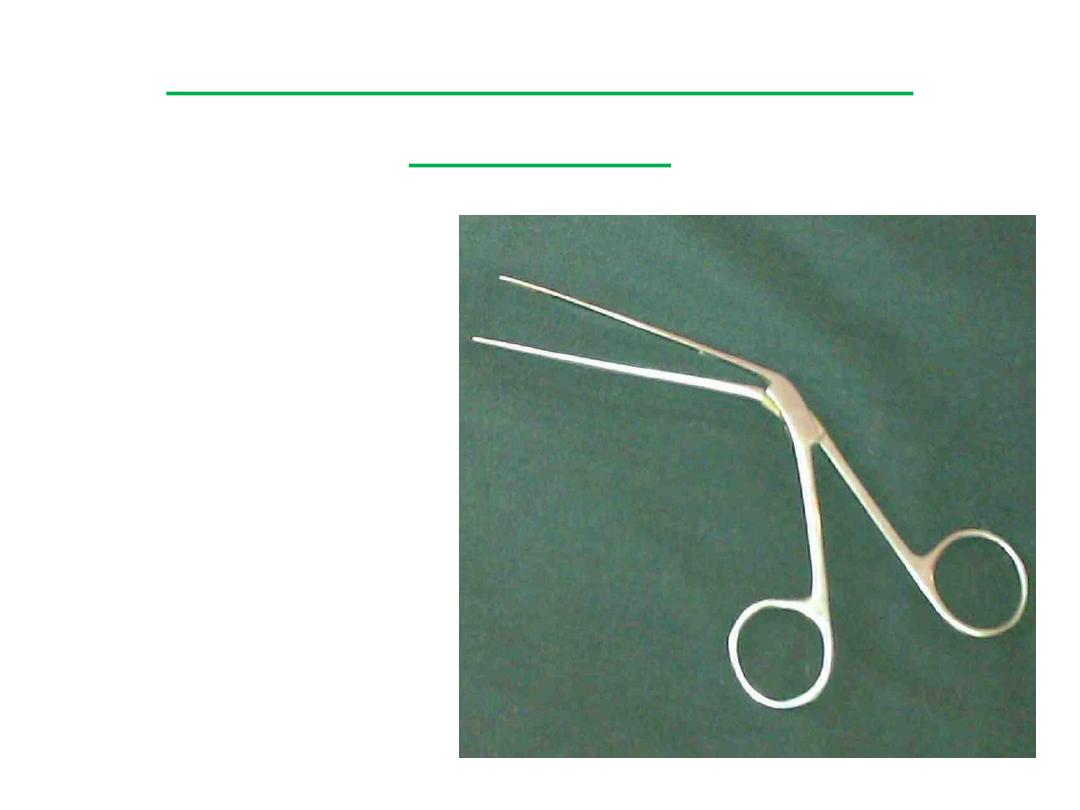
Tilley's Nasal Dressing
Forceps
• This nasal instrument has
important functions in
both the OPD and the
operating room. It is also
called the packing
forceps or dressing
forceps. No nasal surgery
set is complete without
these forceps.

• Uses of the nasal dressing forceps:
To perform anterior nasal packing
To remove foreign bodies, crusts or packs from the nose
To pack the nose with gauze strips during nasal surgeries or sinus
surgeries
To remove cartilage and bone pieces during septoplasty or SMR
• Identifying the nasal packing forceps:
Like most nasal instruments, these forceps are bent at an angle so
the hand grasping the instrument doesn't obstruct the vision of the
examiner. The blades are long and thin so they can be easily
inserted into the nasal cavities.
• Differentiating nasal and aural forceps:
Both instruments are very similar to look at. The difference is in the
tip. Aural forceps have tips that are triangular while the tip of the
nasal forceps is straight and serrated. The serrations give grip to the
instrument and help grasp the various objects mentioned above.
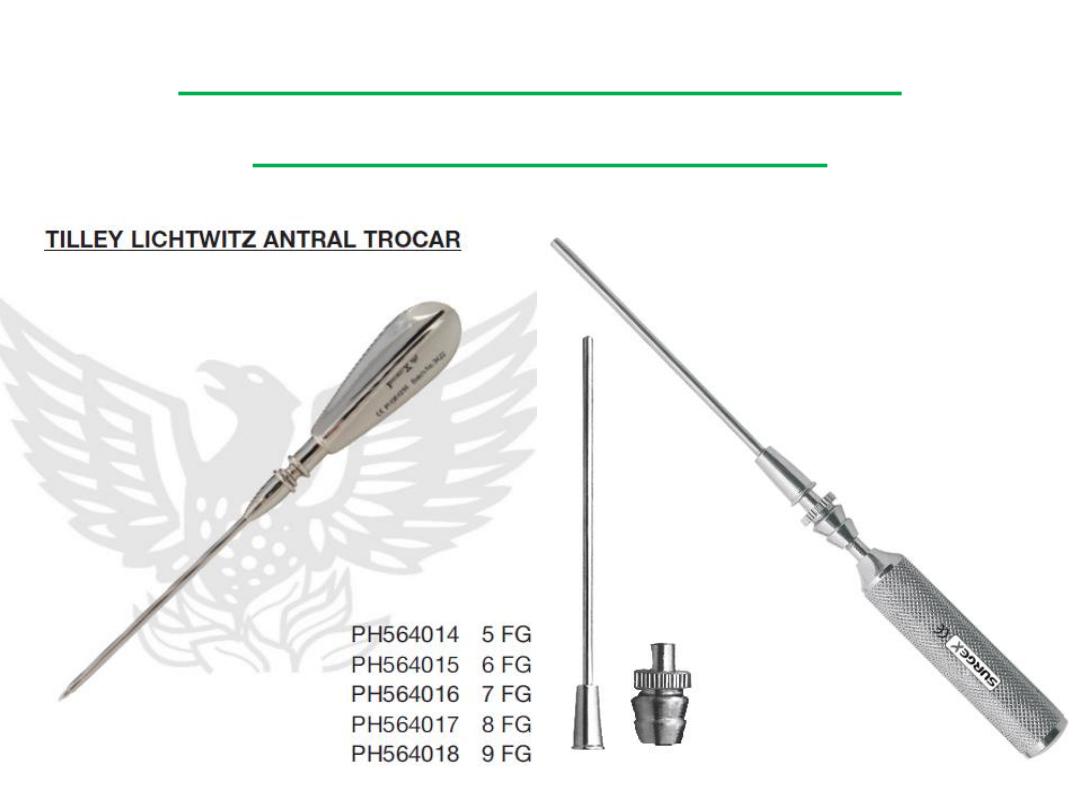
Tilley Lichtwitz Antral
Trocar & Cannula

• The following instruments are used in procedure of Antral Lavage:
Tilley's Forceps Lichtwitz Antral Trocar Cannula
Higginson's Rubber Syringe Nasal Speculum
• Technique of antral irrigation
Local anesthesia is introduced to the inferior meatus with a cotton-
tipped applicator soaked in local anesthetic or with a mixture of
lidocaine hydrochloride and prilocaine hydrochloride (EMLA cream,
Astra-Zeneca) instilled with a suction needle and a syringe.
Maxillary sinus puncture is performed with a straight needle
(circumference: 1.3–2 mm, length: 12 cm) under the inferior
turbinate. The stylet is removed and a 100 mL syringe is connected
to the needle with a prefilled silicon tube and a connector.
Irrigation is performed with warm (38°C) physiological saline
solution with the patient sitting in a forward leaning position.
Antral irrigation

• Medical uses
It can be used as therapeutic procedure for:
o Acute and chronic maxillary sinusitis not responding to medical
treatment.
o Chronic infections not responding to treatments.
o Irrigating and washing out collected purulent secretions.
o Dental maxillary sinusitis.
o Oro-antral fistula if associated with sinusitis.
o Acute Bacterial Rhinosinusitis. Though it is indicated only in severe
cases not as a regular treatment.
It can be also used as diagnostic procedure for:
o Carrying out culture and sensitivity test if the returning fluid
is mucopurulent or purulent in Chronic Sinusitis.
o Exfoliative cytology of the returning fluid to rule out any
malignancy.

• Complications
1) Vasovagal shock: Due to over stimulation of the vagus nerve, the
patient may become pale, may faint and fall down and the pulse
rate may decrease.
2) Bleeding may occur at the site of the puncture which stops in a
short time with cotton wool plug.
3) False passages into cheek or orbit leading
to emphysema or extravasation of fluid into the cheek or lower
eyelid or orbit. Also may lead to cerebrospinal fluid leak and
haematoma.
4) Infection in the maxillary sinus is common.
5) Anaesthetic complications may occur.
6) Air embolism.

Examination of
the throat

• Inspection
Lips: color, lesions, symmetry
Oral cavity: breath odour, color, lesions of buccal mucosa
Teeth and gums: redness, swelling, caries, bleeding
Tongue: colour, texture, lesions, tenderness of floor of mouth
Throat and pharynx: colour, exudates, uvula, tonsillar symmetry and
enlargement
• Examination of the throat includes a thorough
examination of the oral cavity:
Ask the patient to remove dentures, and examine their mouth
systemically (use a bright torch): tongue, hard and soft palate,
tonsillar fossa, gingivolabial/gingivobuccal sulci, floor of
mouth/undersurface of tongue as follows:
Examine the mouth and note the condition of the tongue.
Examine back of tongue and tonsils (press down on the tongue with
a tongue depressor).

Palpate the base of the tongue (look for tumours that may not be
easily visible).
Inspect the uvula and soft palate.
Inspect the hard palate (ask the patient to tip their head backwards,
until the whole hard palate is visible).
Examine the buccal area and the gingivolabial (gingivobuccal) sulcus
(the space between cheek and gums).
Examine the floor of the mouth, check for submandibular duct
stones or masses (ask the patient to stick their tongue out).
Examine the nasopharynx and larynx with a mirror or flexible
fibreoptic nasendoscope.
Lack's Tongue Depressor

• This is a very commonly used OPD instrument. It has two blades at
right angles to each other. One of them is slightly wider than the
other and is completely flat. This is the part of the tongue
depressor that is inserted into the oral cavity. The other blade is
narrower and has a slight curve at its free end, like a handle. This is
the part of the instrument that is held in your hand.
• Uses of the tongue depressor:
Examination of the oral cavity – vestibule, buccal mucosa, gums,
floor of the mouth
Examination of the oropharynx and posterior pharyngeal wall
Used in posterior rhinoscopy, along with the postnasal mirror
For the ‘cold spatula test’ – to assess (approximately) the nasal
airway/ patency in the OPD
To perform minor procedures in the oral cavity
To take a throat swab or a swab from the tonsil

• How to use the tongue depressor:
Hold the instrument by the narrower blade that acts as a handle.
Insert the other blade into the oral cavity.
First retract the cheek so you can examine the vestibule, buccal
mucosa and gums and repeat the same on the other side.
Then place the blade flatly on the dorsum of the tongue and press it
down – this will allow you to examine the palate, tonsillar pillars,
the tonsils and the posterior pharyngeal wall.
Take care to depress only the anterior two-thirds of the tongue with
this instrument. Touching the posterior third of the tongue will elicit
the gag reflex.
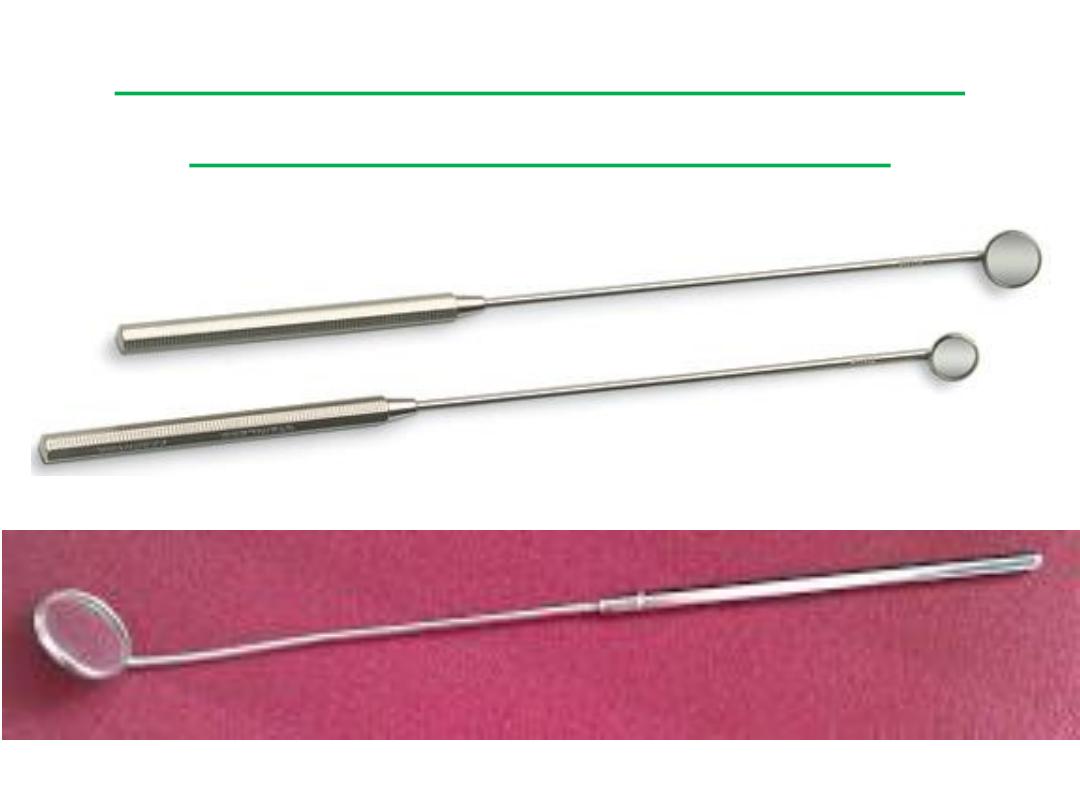
Laryngeal mirror (Indirect
Laryngoscopy Mirror)

• This mirror is used to examine the larynx in the outpatient using a
procedure called indirect laryngoscopy. The shaft of the indirect
laryngoscopy mirror is straight, a feature which helps differentiate it
from the posterior rhinoscopy mirror which has a bent shaft.
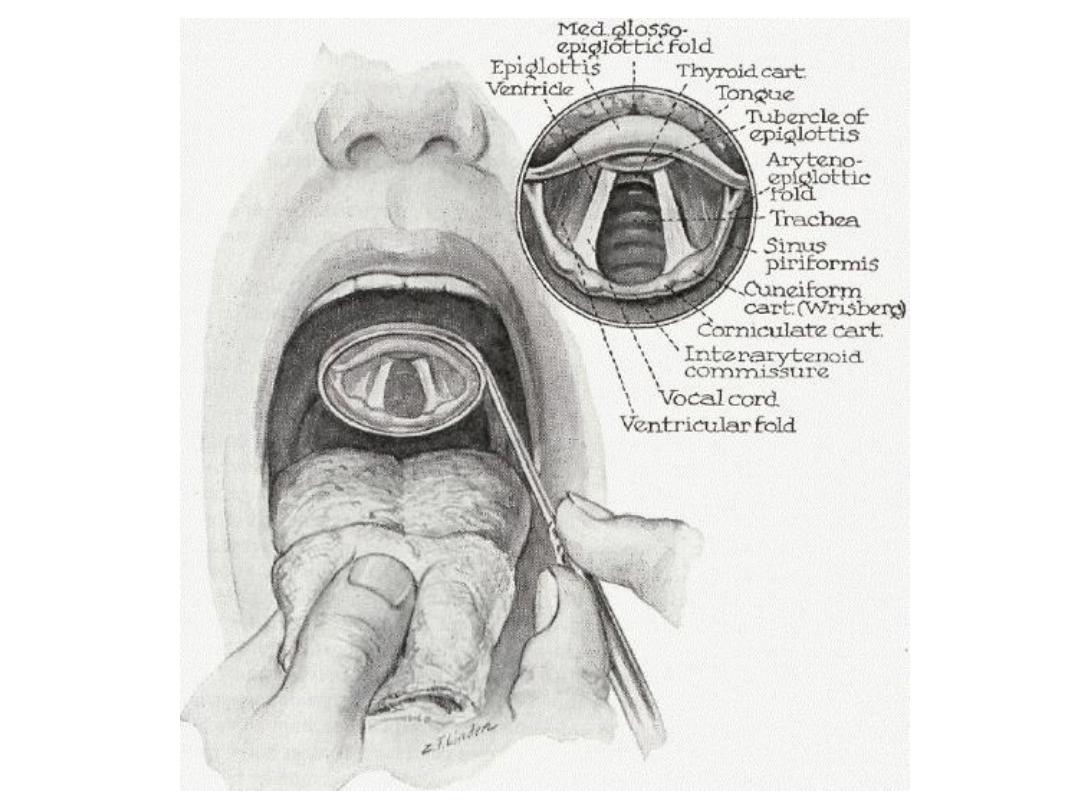
• How indirect laryngoscopy is done:
The indirect laryngoscopy mirror is warmed to avoid fogging on it.
The patient is asked to protrude his/her tongue which is then held
with a piece of gauze.
The patient is directed to breathe through his/her mouth.
The warmed indirect laryngoscopy mirror is then introduced into
the oral cavity with the mirror facing downwards. (Check its
temperature by touching the back of your hand with it, it should
not be hot.)
The mirror is brought to rest against the uvula but do not touch the
posterior pharyngeal wall to avoid setting off the gag reflex.
Once the laryngeal inlet is visualized, the patient is asked to say
‘eee’ to check the movement of the vocal cords.
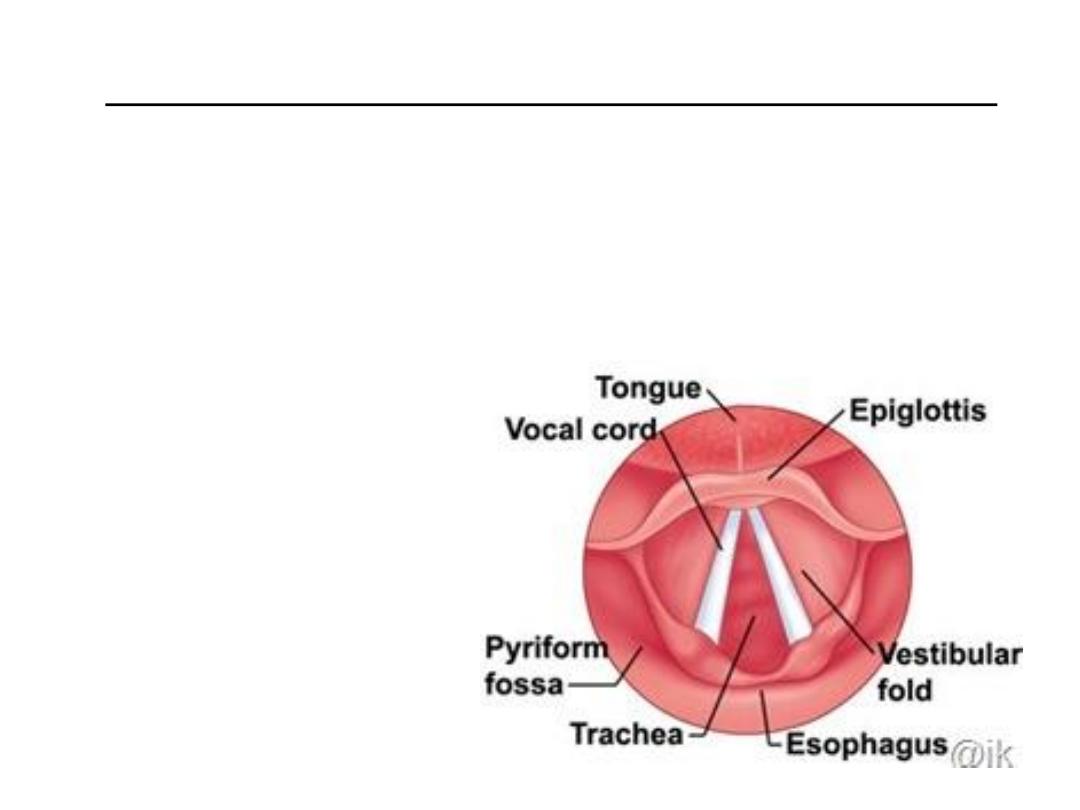
• Structures seen on indirect laryngoscopy (in order):
Base of the tongue (posterior one-third of the tongue)
Vallecula
Median and lateral glossoepiglottic folds
Epiglottis
Pharyngoepiglottic folds
Aryepiglottic folds
Arytenoids
False vocal cords
True vocal cords
Tracheal rings

• Indications for indirect laryngoscopy:
Examination of the larynx in cases of change in voice
Examination for dysphagia
To look for vocal cord mobility prior to thyroid surgery
To look for the primary in cases of neck metastases
• More information:
The mirror is available in 5 sizes, the smallest is 1 and the largest 5.
Using flexible fibreoptic laryngoscopy is another method of
examining the larynx in the OPD.

Tracheostomy
It's defined as creation of an opening in the trachea and converting this
opening into a stoma with the skin.
Indications:
1) Relief of respiratory obstruction:
Congenital causes: bilateral choanal atresia, laryngeal web or cyst &
tracheo- esophageal anomalies.
Traumatic: ○
External: blows on the larynx, gunshots or cut throat.
o Internal: Inhalation of steam or fumes, foreign body and swallowing
of corrosives.
Infections: Acute epiglottitis, acute laryngotracheobronchitis and
diphtheria. - Tumors: Malignant disease of the tongue,
pharynx, thyroid, and larynx.
Miscellaneous causes: Haemophilia & Angioneurotic oedema.
Bilateral laryngeal nerve palsies: after thyroid surgery or bulbar palsy
Cord fixation due to rheumatoid arthritis.

2) Protection of the tracheobronchial tree.
In conditions that are leading to inhalation of saliva, food or gastric
contents, stagnation of bronchial secretion as in CNS disorders,
burns of the face and neck and head injury.
3) Tracheostomy aids respiration in artificial or intermittent
positive pressure ventilation;
in cases leading to respiratory
insufficiency; as in chronic bronchitis, emphysema, post operative
pneumonia and chest injury.

Types of tracheostomy tubes
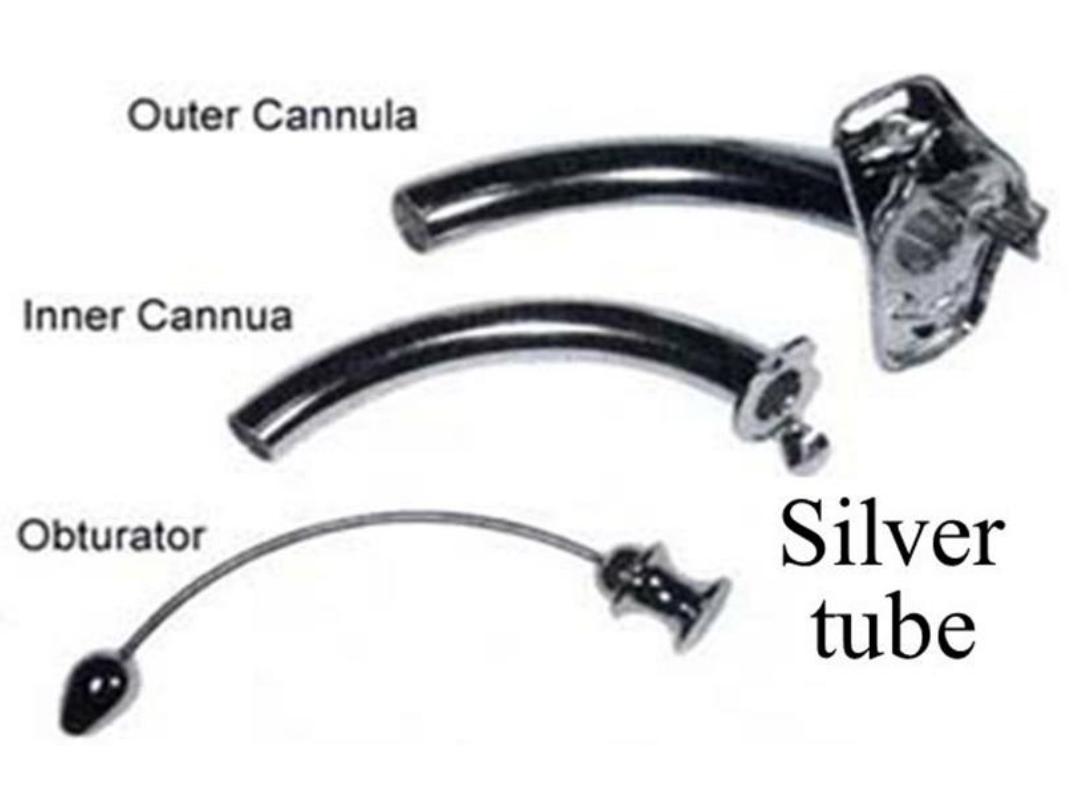
A. Metallic tracheostomy tube (Silver-Jackson's tube):
It is composed of inner and outer tube with trocar or introducer to
insert the tube into the trachea.
Advantages: Composed of inner and outer tube; the inner tube
collects the secretions on it and can be removed while the outer is
retained in position securing the airway.
Disadvantages: 1) More traumatic than the plastic tracheostomy
tube. 2)
Have no cuff so it can't be used in artificial ventilation.
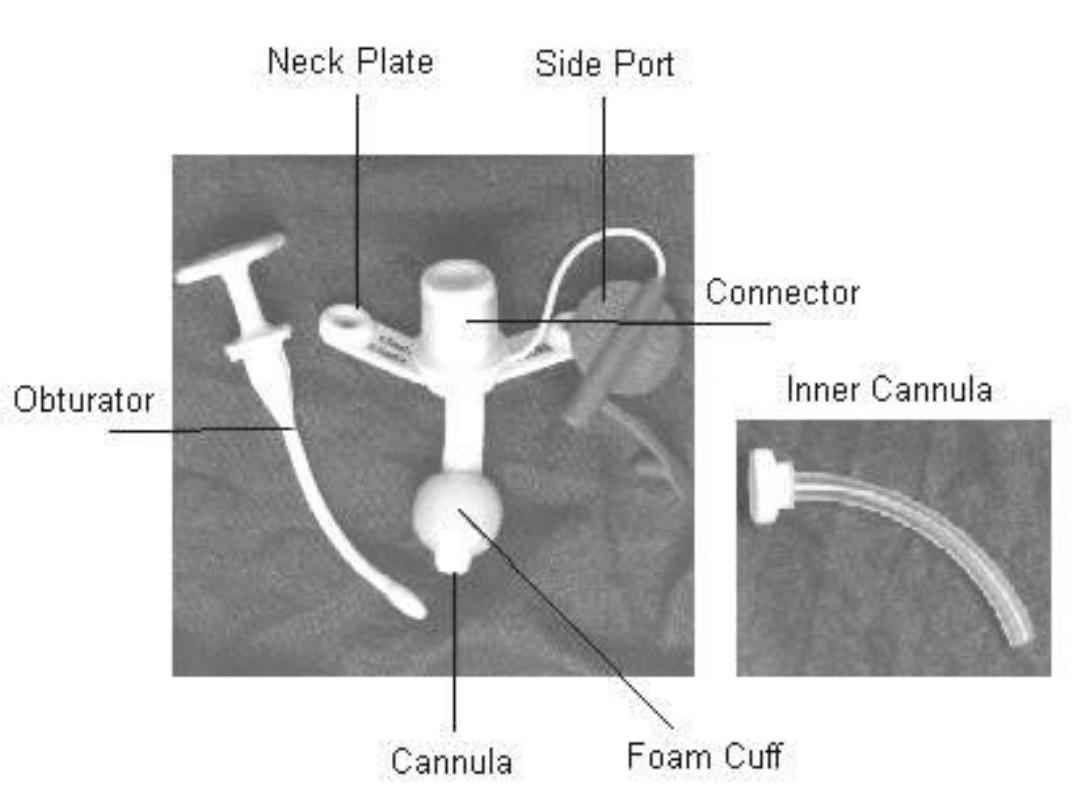
B. Plastic tracheostomy tube (portex)
Advantages: 1) Less traumatic. 2) Have cuff so it can be used in
artificial ventilation.
Disadvantages:
o Have no inner tube so it should, be removed totally to clean up the
tracheostomy tube.
o The cuff may produce pressure necrosis on the tracheal mucosa
leading to ulceration and stenosis.


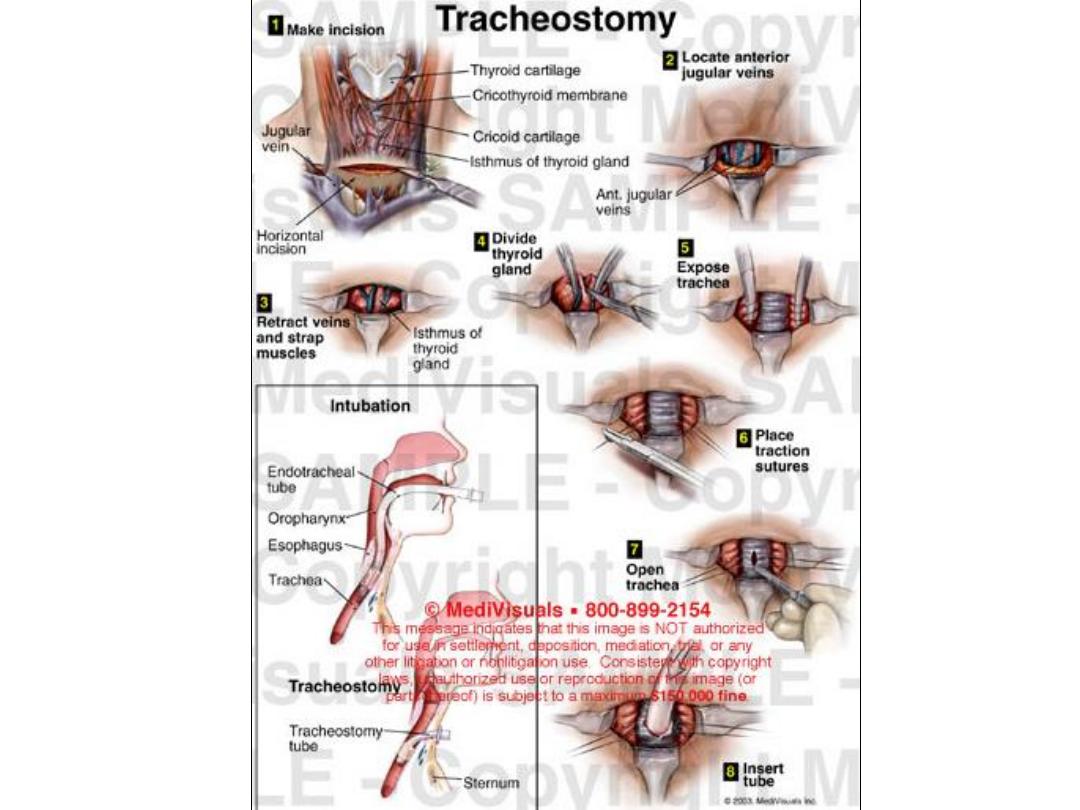
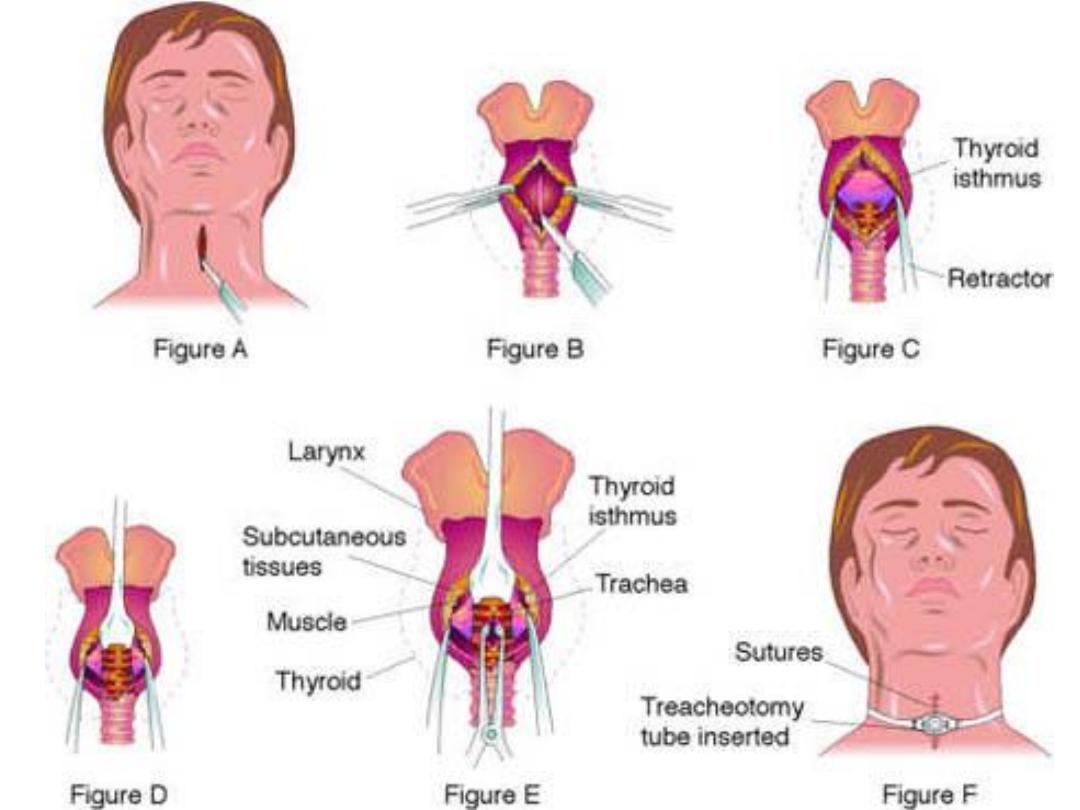
Procedure of tracheostomy
1) In emergency conditions vertical incision is preferred while in
elective cases we do transverse incision.
2) Separation of subcutaneous tissues, strap muscles and pretracheal
fascia in vertical line.
3) Transaction of the thyroid isthmus & ligation of the pedicles.
4) Vertical opening in the trachea between 2-4
tn
tracheal and
insertion of the tube or make a circular window in the trachea.
5) Loose closure of the skin & light dressing to prevent surgical
emphysema from development.

Post operative management:
1) Nursing in the first 24 hours post operatively is of utmost
importance.
2) Position: the patient must, be sitting upright- in bed
3) Suction with sterile catheter into the trachea applied regularly with
aseptic technique.
4) Humidification either by using humidifier or moistened gauze over
the tracheostomy.
5) Prevention of apnea in cases of long standing obstruction, apnea
may follow restoration of the airway, with lowering of pCO2,
carbon dioxide 5-7% in oxygen is given through the tracheostomy.
6) Care of the tube and changing it or cleaning by removal of the
inner tube in case of metallic tracheostomy tube.
7) Care of the wound of the tracheostomy with dressing and
antibiotics.

Physiological changes after tracheostomy:
A 10-50% reduction in anatomical dead space.
Loss of voice due to bypassing the larynx during breathing.
Difficulty in swallowing due to tethering of the trachea to the skin.
Loss of humidification; cold dry air hits tracheobronchial tree which
interfere with ciliary function allowing accumulation of secretion.
Loss of glottic valve closure required for effective coughing.
Complications of tracheostomy:
• Immediate:
1) Hemorrhage from the thyroid isthmus, abnormally placed blood
vessels, skin edges.
2) Recurrent laryngeal nerve injury.
3) Apnea secondary to loss of hypoxic drive.
4) Cardiac arrest secondary to the adrenaline surge and the sudden
rise in pH as CO2 is washed out.
5) Air embolism, Pneumothorax, Creation of a false passage.

• Intermediate:
1)
Cellulitis.
2)
Displacement of the tube with suffocation may occur if completely
displaced outside the tracheal opening, the tube should be re-
inserted at once.
3)
Tube obstruction.
4)
Surgical emphysema.
5)
Tracheal wall ulceration or necrosis.
6)
Dysphagia due to tethering of the trachea to the skin.
7)
Pneumomediastinum.
• Late:
1)
Perichondritis & stenosis may develop in the subglottic region if
the tracheostomy involves the 1st tracheal ring.
2)
Tracheo-oesophageal fistula can result from pressure of an ill-
fitting tube against the posterior wall.
3)
Tracheo-arterial fistula can result from pressure of an ill-fitting
tube against the great vessels in the neck especially in children.

Other
Examination &
tools

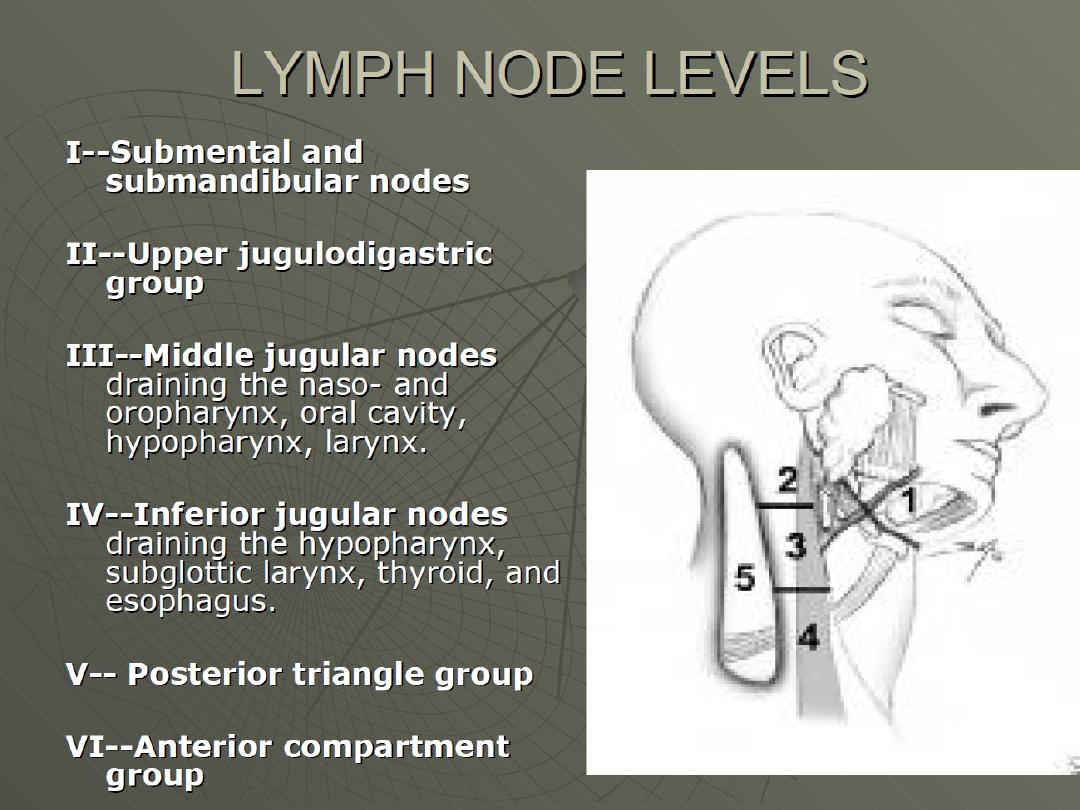
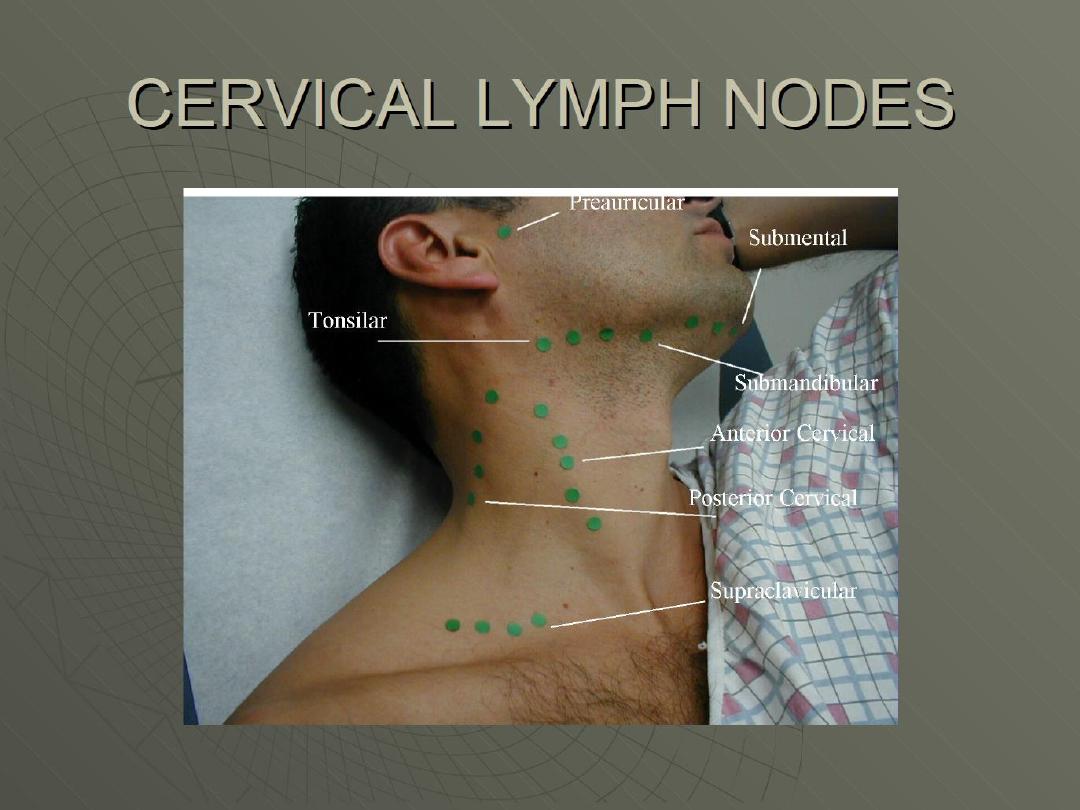
Neck
• Inspection
Symmetry
Swelling
Masses
Active range of motion
Thyroid enlargement
• Palpation
Tenderness, enlargement, mobility, contour and consistency of
nodes and masses
Nodes – Pre and post auricular, occipital, tonsillar, submandibular,
submental, anterior and posterior cervical, supraclavicular
Thyroid: size, consistency, contour, position, tenderness

Associated Systems for
assessment
A complete assessment should include the respiratory system.

Symptoms requiring urgent
referral
The first step is to determine if the ENT presentation requires an
urgent referral to a physician or nurse practitioner, or can be managed
safely by an RN(C). The following signs and symptoms require referral
to a physician or nurse practitioner:
• Positive Brudzinsky sign (chin to chest)
• Pain and fever with mastoid tenderness
• Difficulty with secretions, drooling • Fever of unknown origin
• Treatment failure after 3 days for otitis media, strep throat or
peritonsillar abscess • Displaced uvula
• Uncontrollable epistaxis
• Facial fractures
• Sudden onset of deafness • Recent ENT surgery
• Hoarseness without fever or illness
• Unexplained vertigo
• Pain out of proportion to clinical findings (consider epiglottitis)
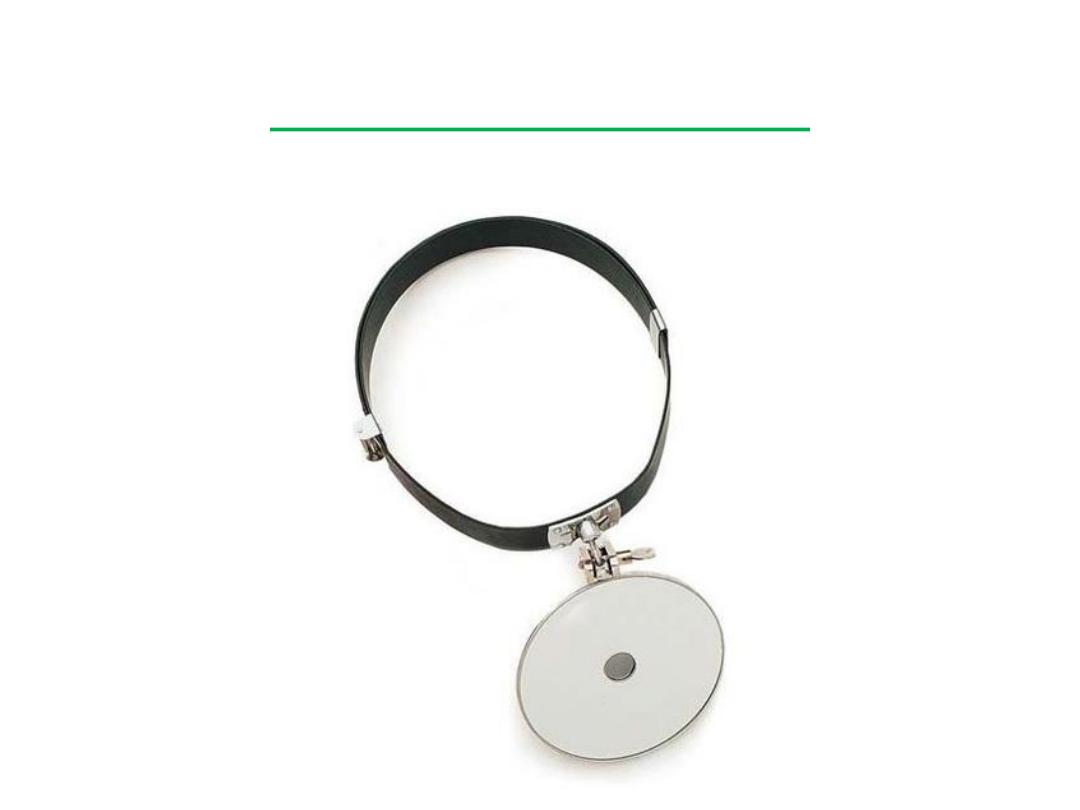
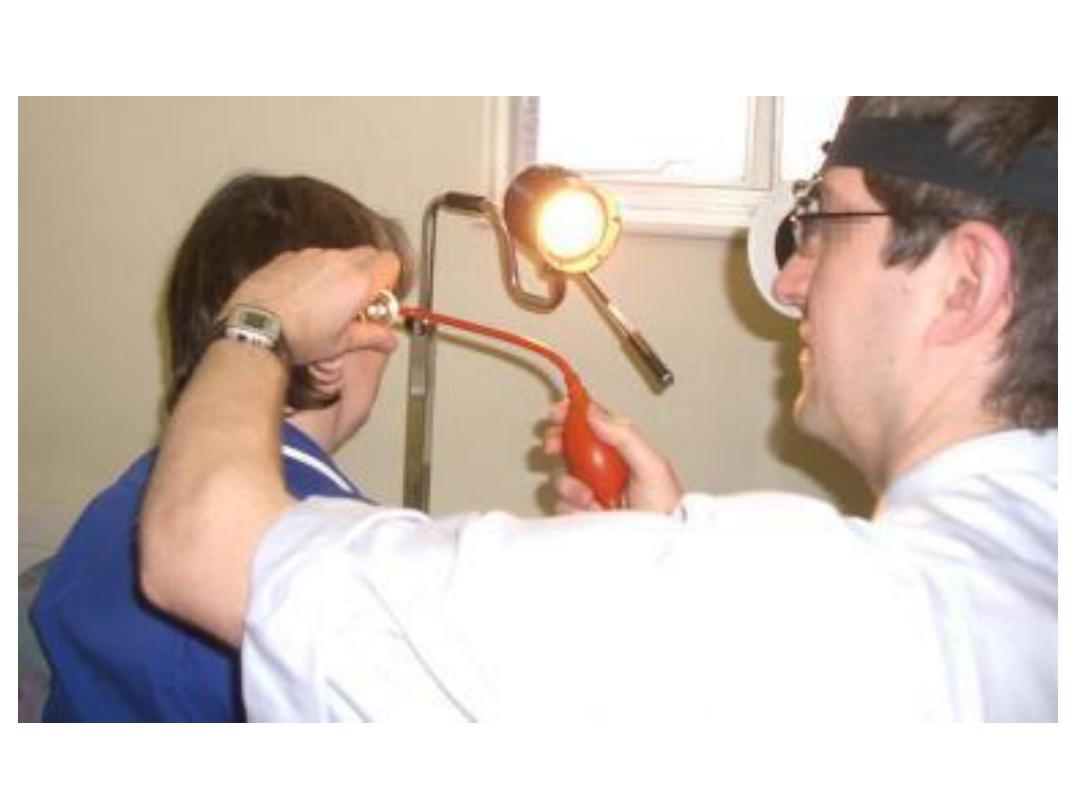
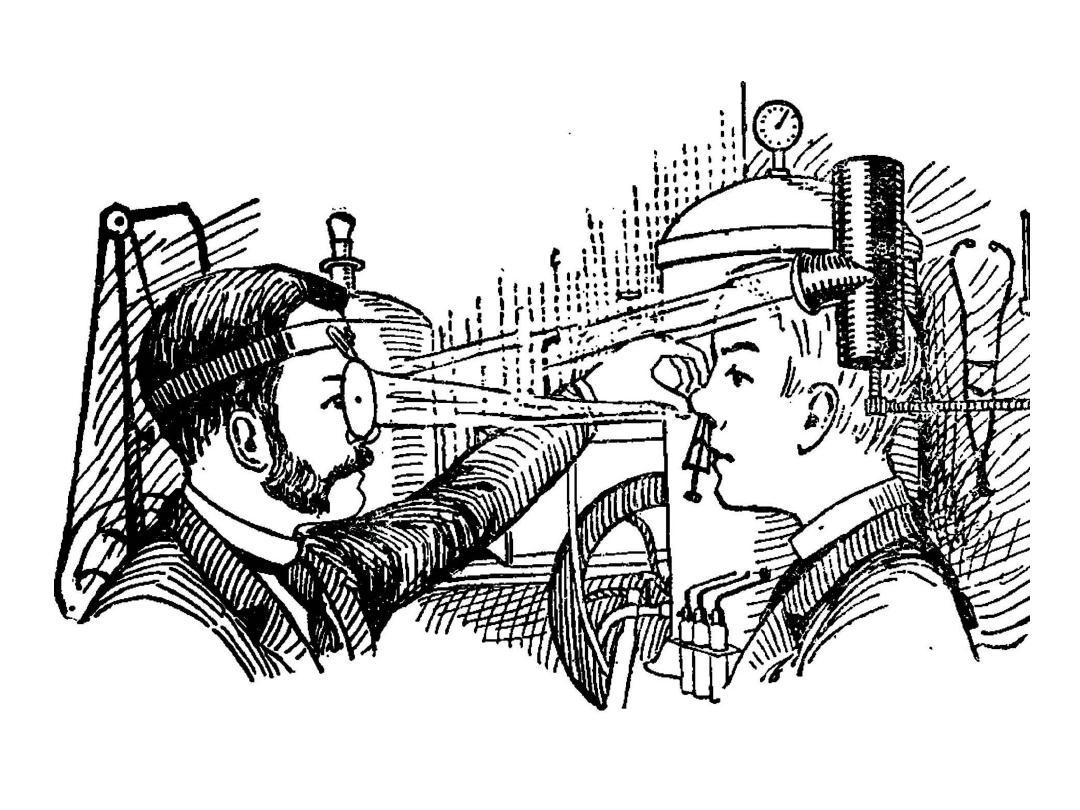
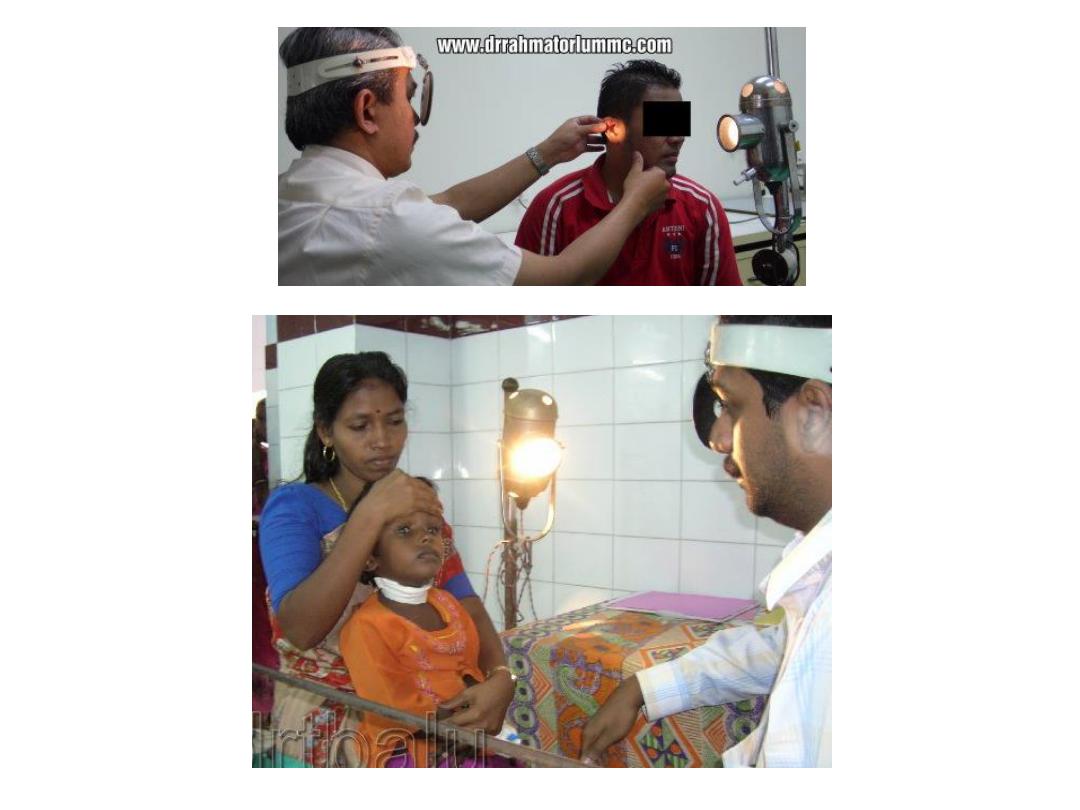
ENT head mirror

• A head mirror is mostly used for examination of the ear, nose &
throat.
• It comprises a circular concave mirror, with a small hole in the
middle, and is attached to a head band.
• The mirror is worn over the physician's eye of choice, with the
concave mirror surface facing outwards and the hole directly over
the physician's eye, providing illumination like a ring light.
• In use, the patient sits and faces the physician. A bright lamp is
positioned adjacent to the patient's head, pointing toward the
physician's face and hence towards the head mirror. The light from
the lamp reflects off the mirror, along the line of sight of the user,
with the light being somewhat concentrated by the curvature of the
mirror. When used properly, the head mirror thus provides
excellent shadow-free illumination.
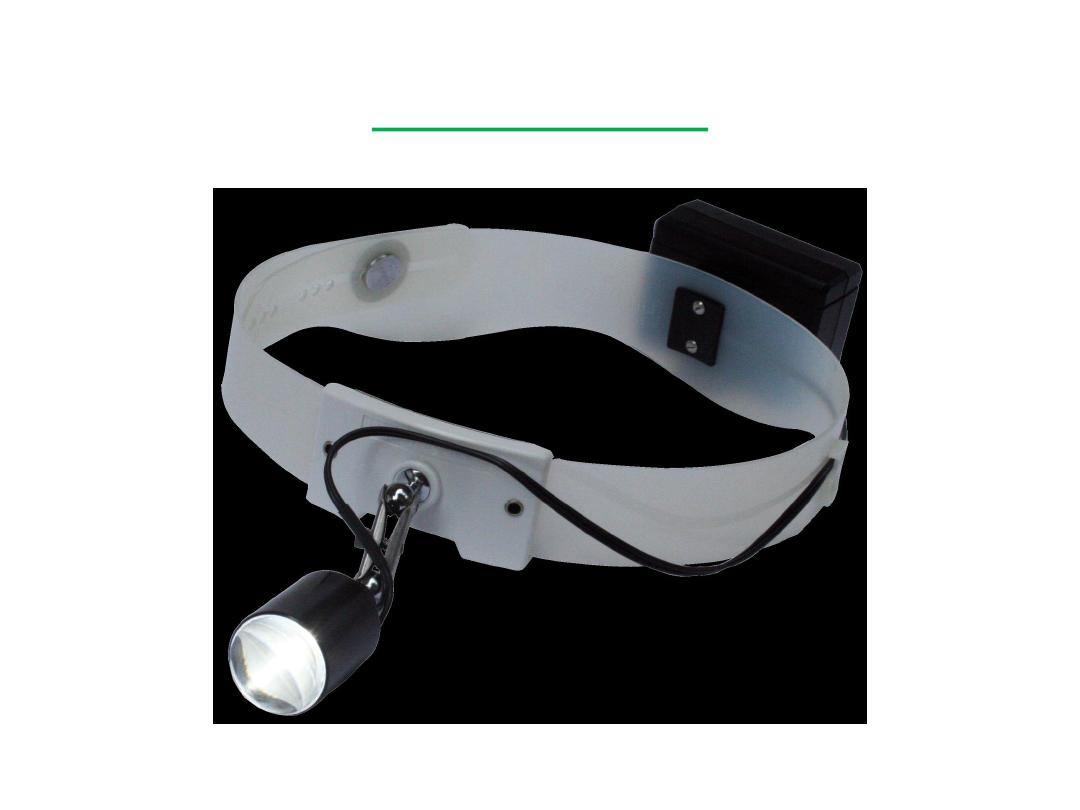
Head light