
57
The Formula dialog box opens (
Figure 10
). Word makes some assumptions based on the fact that the
insertion point is at the bottom of a column of numbers. For example, the Formula box is preloaded
with a formula designed to total the column of numbers. It's almost as readable as plain English:
=SUM(ABOVE). If your insertion point had been at the end of a row of numbers, the formula would
have read: =SUM(LEFT).
2. In the Formula box, check to make sure the formula does what you want, and then click OK.
Word inserts the field code in the cell, and then it runs the calculationin this case, a sum, which then
shows up in the cell.
Figure 10
).
It's not unusual to have several columns that you want to total. If that's the case, you can select the cell with
the SUM field, and then press Ctrl+C to copy it. Then move the insertion point to the next cell, and then
press Ctrl+V to paste it.
58
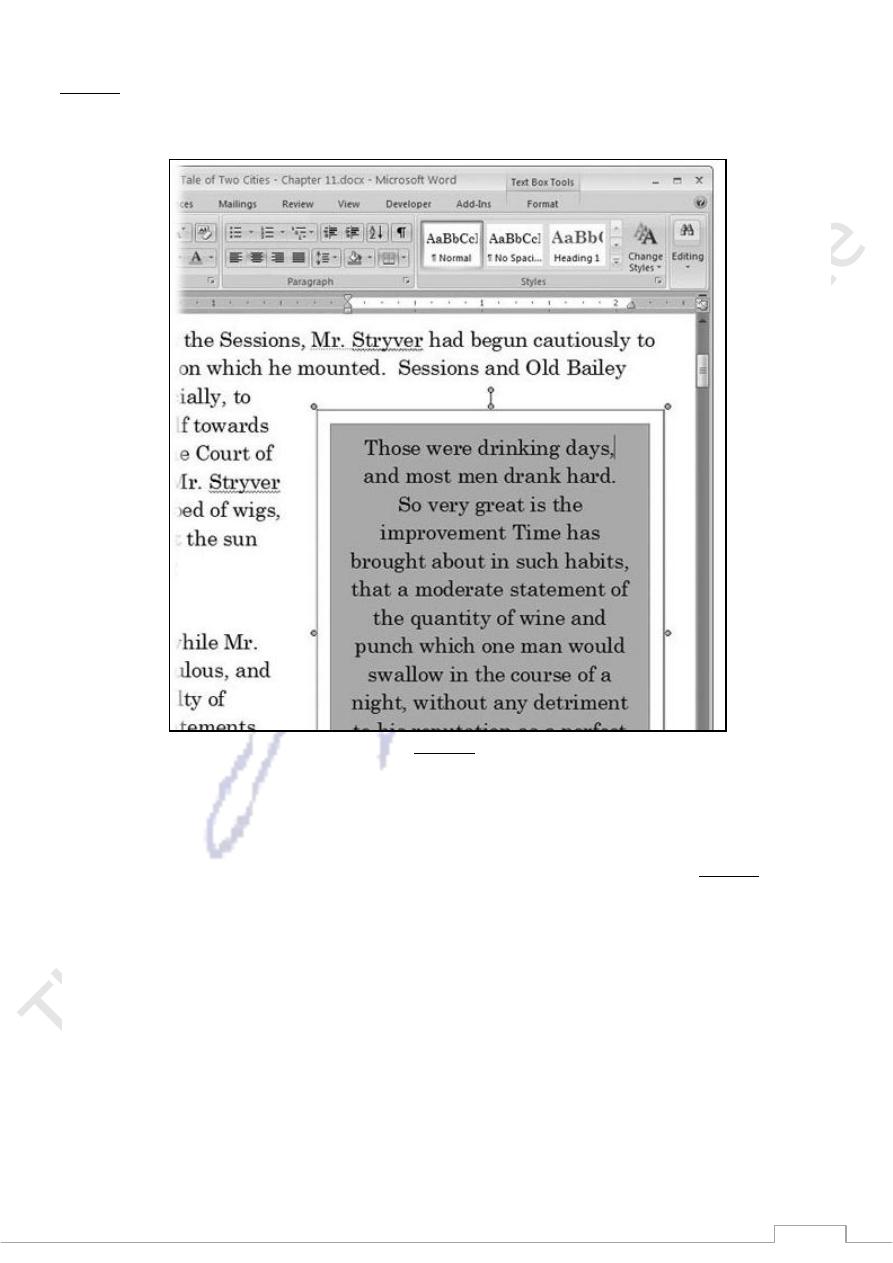
Text boxes are another element that's designed to capture readers' interest and lure them into reading the text
(Figure 1). Text boxes often contain an intriguing quote from the text designed to pique interest. Sidebars
are another common use for text boxes. Like a footnote, but much more attractively formatted, sidebars
provide additional, specific information that's not included in the text.
).
Figure 1
(
Whether it's a pull quote or a sidebar, you create the text box the same way:
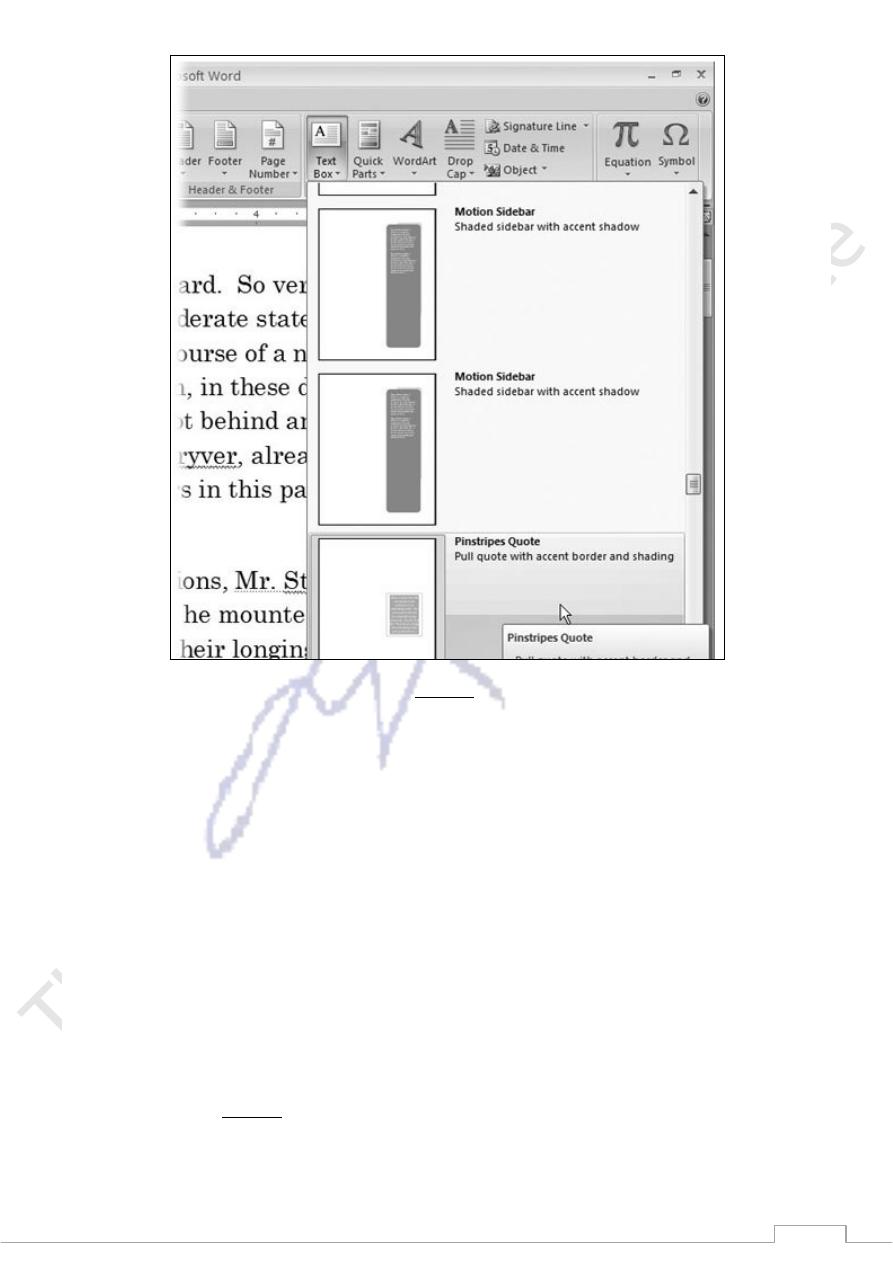
1. On the ribbon, choose Insert →Text →Text Box, and then select a text box style (Figure 2).
The menu shows you good-sized thumbnails of the different styles, making it easy to choose one for
your document. Make your decision based on the general appearance of the text box; don't worry
about positioning or even the size. You can modify those details later.
59
.
)
Figure 2
(
1. Click in the box and begin typing.
If the text box is a pull quote, you can copy text from your document (Ctrl+C), and then click in the
box and paste it (Ctrl+V). The box formats the text you enter to match the style.
2. Size the box to fit your text by dragging the corners or borders.
You may need to adjust the box to fit your material. If you have big empty spaces in the text box,
you can shrink it, or, if you don't have enough room for your text, drag an edge to make it bigger.
3. Position the text box by dragging it or by using the Position drop-down menu.
To drag a text box to a new position on the page, hover the mouse over a part of the text box where
there isn't any text, and your cursor changes to the "move" icon (a cross with four arrows). Drag the
text box to a new position.
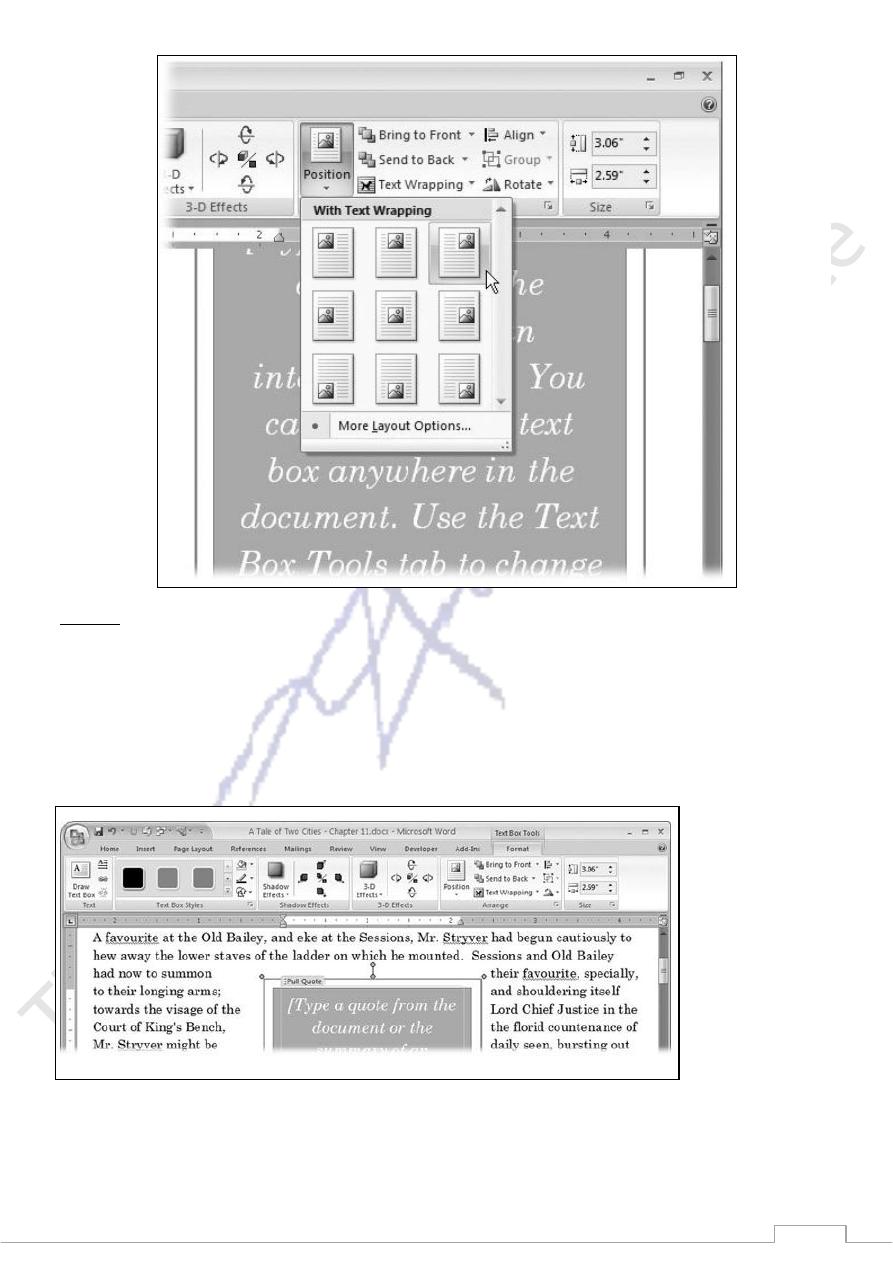
The other way to position the text box is with a ribbon command. When you click the text box, the
Text Box Tools contextual tab appears. Choose Text Box Tools | Arrange
→
Position to open the
Position menu (Figure 3).
61
(Figure 3).
Customizing your text box
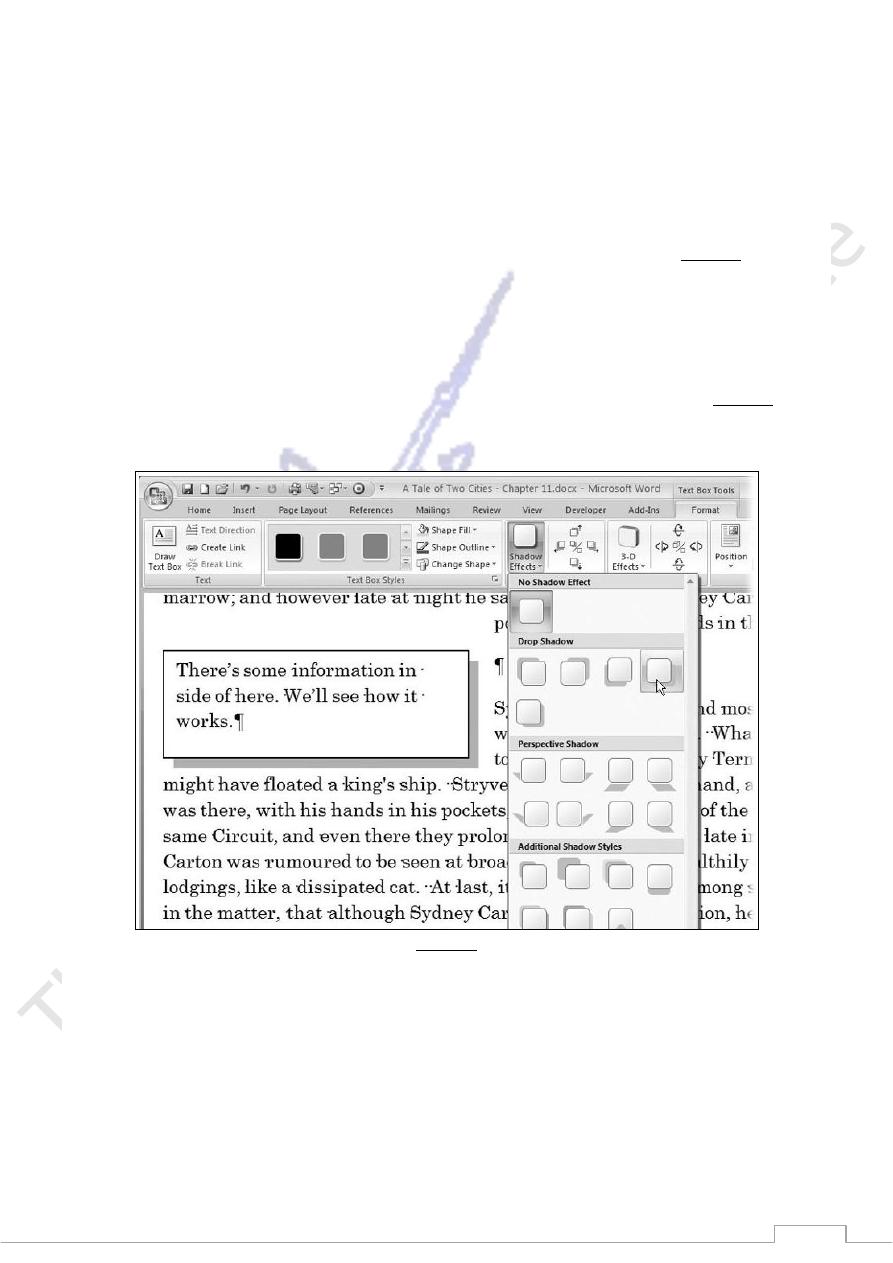
When you select a text box in your document, the Text Box Tools contextual tab appears on the right side of
the ribbon (Figure 4). Using the commands on the Format tab, you can make all sorts of changes to your text
box. The colors and effects make use of your document's theme. Here are some of the ways you can change
the look of your text box:
(Figure 4).
Text Direction,. With a click of a button, you can change the direction your text runs. For example,
for a heading or a special effect, your text can run up from the bottom of the page.
61
Create Link,. You can create sidebars where the text continues from one page to the next. Select the
first text box, click the Text Box Link button (Layout
→
Text
→
Text Box Link), and then click the
second box. Text flows from one box to the next, just like normal text flows from page to page. Just
keep an eye on the end of your text in the last box to make sure it's a good fit.
Text Box Styles. Click one of the colors in the Text Box Styles group to change the highlight colors
for your box. Choices include solid colors and blends. Using other options in the styles box, you can
adjust the fill and outline colors and even the box's shape.
Shadow Effects. Most of the text box styles include drop shadows. Use the tools in the Shadow
Effect group (Text Box Tools | Format
→
Shadow Format
→
Shadow Effects) to modify the types of
shadow and the direction. The drop-down menu provides preformatted effects (Figure 8). The tool to
the right of the menu gives you controls to turn the drop shadow effect on and off and to change the
shadow's position.
3-D Effects. The 3-D effects work like the shadow effects. They change the background of the text
box, but the text stays put. Use the dropdown menu to choose predesigned effects, or use the tool to
the right of the menu to create your own custom effect.
Arrange,. Use the tools in the Arrange group (Text Box Tools | Format
→
Arrange) to position your
text box in relationship to the page and other items. The Position drop-down menu (Figure 6)
automatically places the text box on the page and sets the word wrap options. As an alternative, you
can use the separate Align and Text Wrapping tools.
)
Figure 6
(
Bending Words with WordArt
WordArt is a lot more fun than it is useful. How often do you really need arched headlines in your
documents? On top of that, you can waste a lot of time fiddling with all the options to see the cool effects
you can produce (Figure 7(
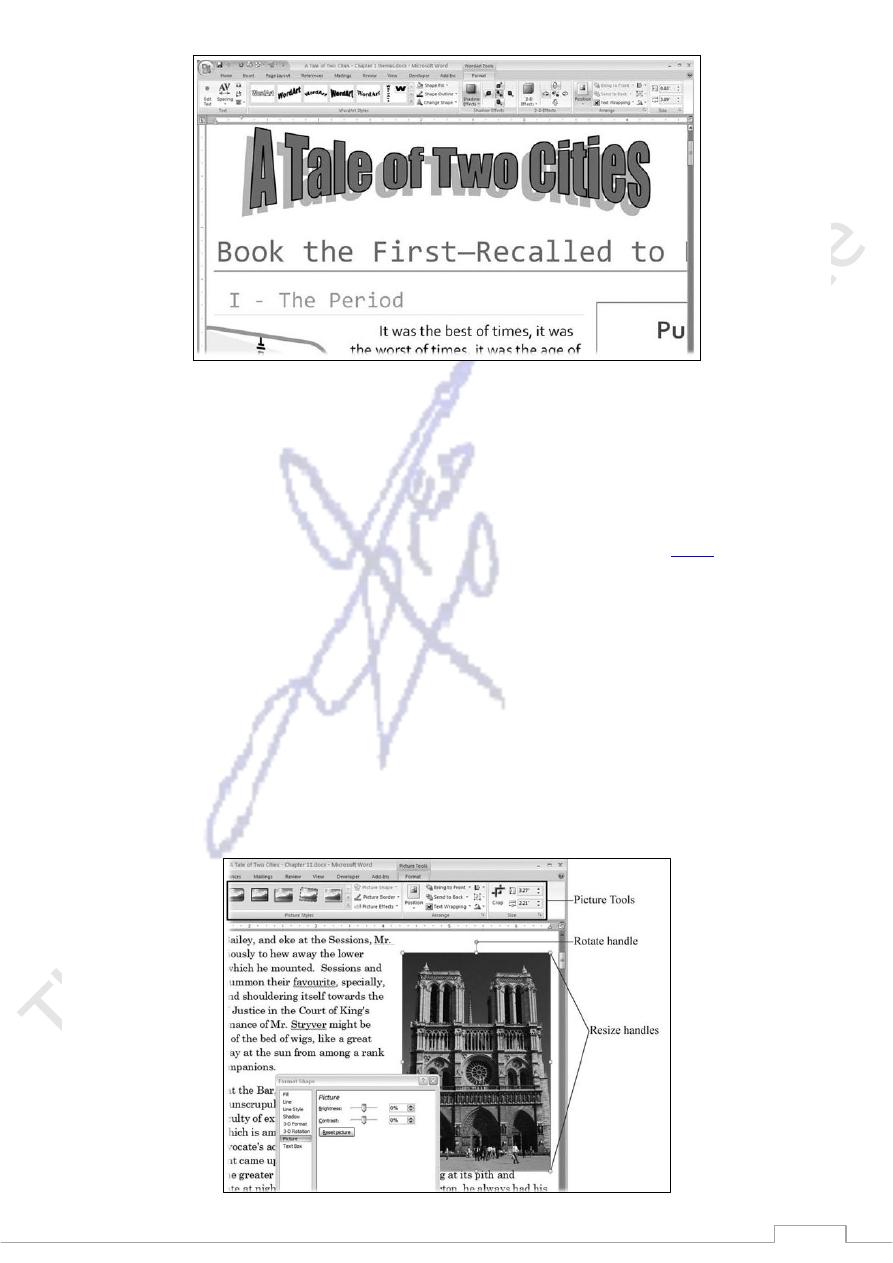
62
To transform a word in your document into WordArt, double-click to select the word, and then choose Insert
→
Text
→
WordArt to see the menu of WordArt designs. If you click the one that suits your artistic purposes,
you see your word transformed.
Modifying WordArt
When you click to select your WordArt creation, the WordArt Tools contextual tab appears on the right side
of the ribbon. The commands are very similar to the text box commands described in
above
sections. You
can make adjustments to 3-D effects and drop shadows and specify the text wrapping options .
In spite of the incredible ways you've transformed your word, it's still text to Microsoft. So if you catch a
misspelling or need to make other changes, choose WordArt Tools | Format →Text →Edit Text to open the
Edit WordArt Text box, where you can fix things up.
Working with Pictures and Clip Art
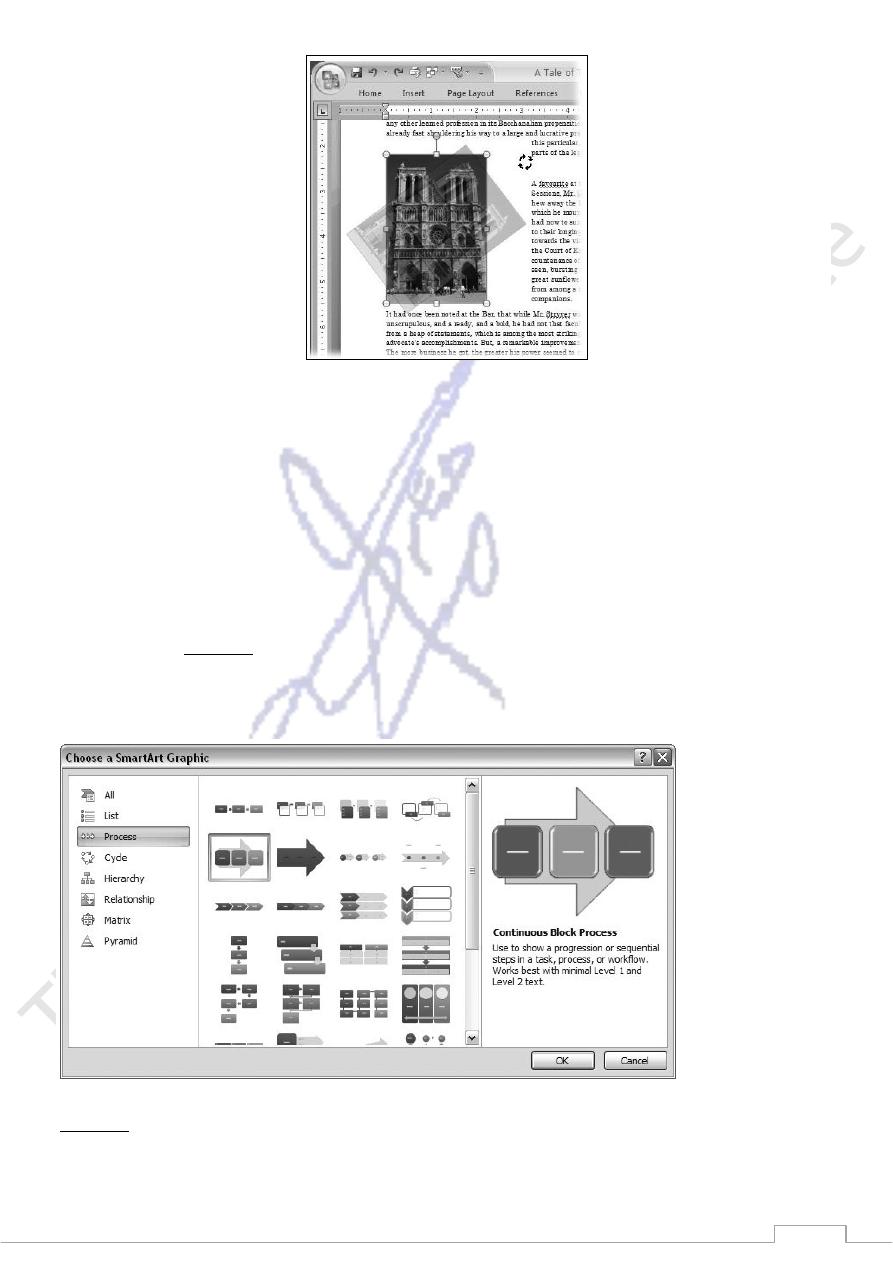
When you insert a picture into your document, Word places it in a frame, similar to a text box or the frame
around a drop cap. And as with those other objects, you can resize it, move it, and wrap text around it. As far
as Word's concerned, if it's a graphic filelike a .JPG, .TIF, or EMF filethen it's a picture. The contents can be
a photo or a drawing; it's all the same to Word. Once you've placed a picture in your document, you can edit
it using any of the Picture Tools (Figure 8).

63
(Figure 8).
Inserting Pictures into Your Document
To get some practice with Word's picture tools, in these steps you'll insert a picture into your document and
then adjust its formatting and positioning.
1. Click to place the insertion point where you want to insert the picture.
Don't worry about putting the insertion point exactly where you want the photo. You'll be able to
fine-tune the placement after it's on the page.
2. Choose Insert
→
Illustrations
→
Picture to open the Insert Picture dialog box.
The Insert Picture dialog box starts out showing you the contents of your My Pictures folder. You
can use the tools along the left side and top of the box to navigate to any folder on your computer or
network that contains image files. For example, if your computer is connected to a network, and you
have a photo library on one of the other network computers, click the My Network Places button in
the lower-left corner.
3. When you find the picture you want to use, double-click it to place it in your document.
Double-clicking does the same thing as selecting the photo, and then clicking the Insert button in the
lower-right corner. The Insert Picture box closes, and you see your photo in your document.
4. To resize the picture, Shift-click, and then drag one of the corners.
When you close the Insert Picture box, your newly placed picture is selected, as you can see from the
frame and sizing handles around the image. (If your picture isn't selected, click it.) You can resize
your picture by dragging any of the sizing handles on the corners or edges of the picture. As you
resize the picture, while you're still pressing the mouse button, you see both the full-sized image and
a faint copy of the new size. Release the mouse button when the copy is the size you want.
Usually, when you resize, one edge or corner of the image moves and the other edges remain in
place. If you'd rather keep the center anchored while all the edges adjust to the new size, press Ctrl as
you drag a sizing handle. Use the handle that's sticking out of the top to rotate your image (Figure 9).
Tip: To avoid squashing or stretching the image, press Shift as you drag, and your picture keeps its
handsome proportions.
5. On the right side of the Picture Tools | Format tab, click the Position menu, and then choose one of
the positions for your photo.
Generally, it's good design practice to place a picture in one of the corners or at one of the edges of
your document. Occasionally, you'll want to place a picture smack dab in the middle. If one of these
options works for you, you're in luck. Word's Position menu can place your picture in one of these
typical locations, and automatically wraps the text around it.
64
Working with SmartArt
SmartArt is another new Word 2007 feature designed to help busy people create and format a strong,
graphic message. It's a boon to non-artistic business types faced with the challenge of creating a sleek,
professional looking PowerPoint presentation. Maybe the designers at Microsoft decided the world had seen
enough white slides full of black, square bullet points. Still, take the "Art" in SmartArt with a grain of salt.
SmartArt isn't Rembrandt, Gauguin, or even Andy Warhol. It's the kind of art that an MBA lovesrelationship
trees, pyramid charts, and matrices.
Say you have a list of bullet points: a few main topics, each with a few subtopics. Rather than just present
them as bullet points, you want to create a graphic that helps tell the story with impact, so you peruse the
SmartArt library (Figure 10). Once you choose your graphic, you simply type the text you want to add.
Word does all the formatting, sizing, and arranging. If you don't like the finished product, you can choose
another graphic. Word swaps in the new design and does all the reformattingno need to retype the text.
Word knows how to take your bullet points and fit them into any of the SmartArt graphics.
(Figure 10).

65
Like the other graphics in Word, SmartArt takes its cues for colors and fonts from your document's theme,
so you don't have to worry about clashing. SmartArt and Themes are a natural fit. Here are the other
elements that make SmartArt smart:
Layout templates. Each of the images is a template just waiting for your text to deliver a message.
The designs are contemporary and suitable for business and other organizations. You can transfer
SmartArt graphics between the Office 2007 versions of Word, Excel, and PowerPoint, cutting and
pasting artwork between programs.
A text pane for your message. You get to focus on your message and let Word take care of the artsy
design stuff. Because a consistency is present in the design of the templates, Smart-Art can reformat
and reconfigure your text to work with many different graphics and layouts.
Automatic sizing and positioning of shapes and text. One of the most time-consuming issues when it
comes to developing graphics for business presentations is the endless tinkering you have to do every
time you change a word. SmartArt removes this problem. Just edit your text on the text pane, and
SmartArt takes care of the font size and the graphic's shape and size.
Choosing a SmartArt Graphic
SmartArt graphics are divided into categories, each of which arranges information in a particular way. When
deciding what kind of SmartArt to use, think of how you want to present your material:
Lists. Great for individual facts, outlines, procedures, and other, well…lists.
Processes. Used to track the changes in a project or goal, like harvest, production, distribution, sales,
and consumption.
Cycles. Suited to presenting processes that end back at the beginning. Think Winter, Spring,
Summer, and Fall.
Hierarchies. You've seen this type of organizational chart, where bosses proves they really are in
charge.
Relationships. The graphics in this group provide different ways to show the connections between
items. For example, you find concentric circles, vertical tabs with arrows connecting them, and more.
Matrices. This MBA favorite helps businesses make better decisions or at least understand why
things aren't working.
Pyramids. These graphics are good for illustrating proportions. For example, the U.S. Food and Drug
Administration uses a pyramid chart to prove that you're not eating enough fruits and vegetables
Inserting SmartArt into Your Document
SmartArt is a little more complicated than your average drawing, so it takes a few more steps to insert it into
your document.
1. Click to position the insertion point on a page of your document.
You don't have to be exact when you position the insertion point. You'll be able to move SmartArt
later, just like any picture.
2. Choose Insert →Illustrations →SmartArt.
The Choose a SmartArt Graphic box opens (
Figure 11
). It displays categories on the left side,
thumbnails in the middle, and a preview panel on the right.
3. On the left side, click to choose a category.
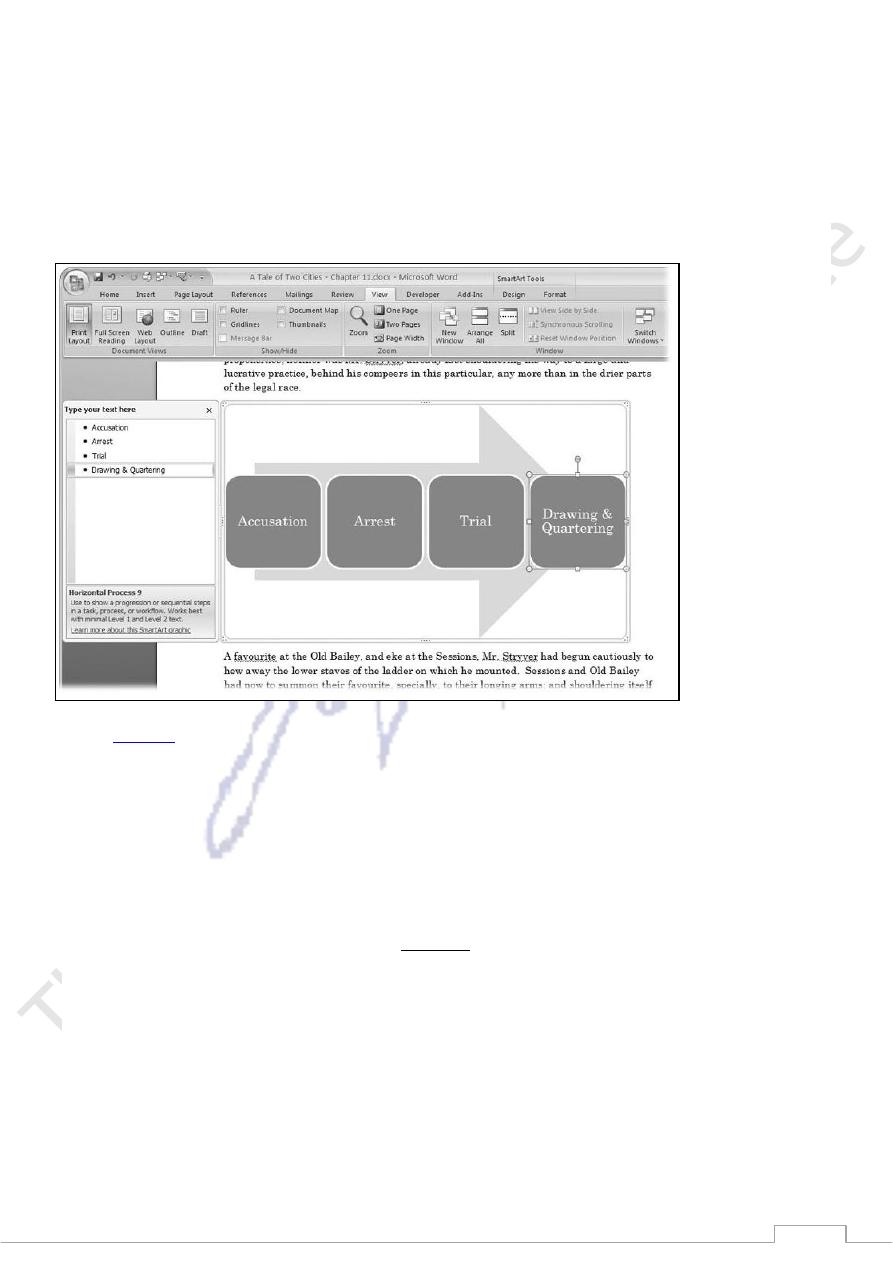
66
Choose from one of the general categories described earlier in this section. Or, if you want to see all
your options, leave the category set to All. Thumbnails appear in the middle of the box. If you need
to, use the scroll bar to check out all the possibilities. When you click a thumbnail, the image in the
preview on the right shows a larger, color version of your selection.
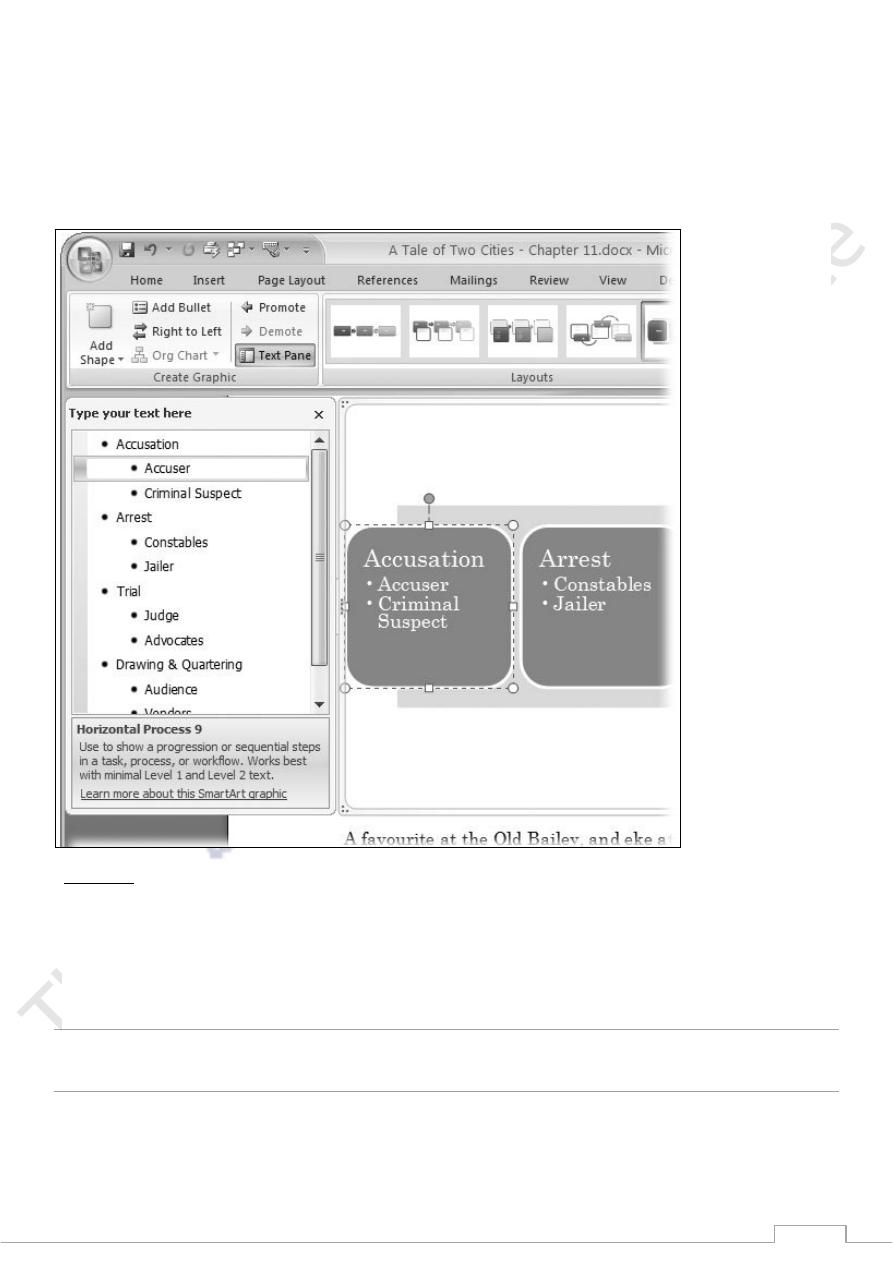
When you've made your selection, click OK to insert the SmartArt into your document.
The dialog box closes, and the SmartArt of your choice appears in your document. A text pane opens
next to the SmartArt, as shown in Figure 11.
(
Figure 11
).
1. In the text box titled "Type your text here," do what it says.
The text box can vary depending on the SmartArt graphics you choose. Almost always, you see a
bulleted list and prompts for you to start typing away.
2. Promote and demote items in your text pane.
You can promote and demote items in your bulleted list, just like you do with an outline. The left
side of the SmartArt Tools | Design tab (Figure 12) also has Promote and Demote buttons.
3. Close the text pane to finish your graphic.
When you're finished, click the X button in the upper-right corner of the text pane to close it, orfaster
stilljust click within the text of your document. You see your SmartArt graphic formatted and in
place.
67
Modifying SmartArt
When you click to select a SmartArt graphic, you don't see the usual Picture Tools contextual tab. Also, the
frame around SmartArt looks different from the frame around other kinds of pictures. That's because you
have a different set of SmartArt tools to use. Two tabs are located within the SmartArt contextual tabDesign
and Format. Use the Design tab to fine-tune layouts and overall styles. Use the Format tab to apply specific
colors and WordArt styles.
)
Figure 12
(
The frame around a SmartArt graphic, although it looks different, lets you move and resize the graphic just
like any other picture. Hold the mouse over the edge of the frame. When you see a cross with four arrows,
you can drag the art to a new place. Hold the cursor over a corner or an edge, and you see a double-arrow
that you can drag to resize the image.
Tip: The little dots on the edges of a SmartArt graphic's frame indicate a handle that you can drag with the
mouse.
On the left side of the frame you see a tab with two triangle-shaped arrows. Click this tab to open the text
pane, where you can edit and add to the text in your SmartArt.
